

 Michael’s Corner #59
November 2007
AutoCAD Back Roads
It seems like this month's collection consists of items you don't find on the main AutoCAD road of life… but may find a bit useful. The Odd Spot and the Basics address two areas that catch even veteran users by surprise. The inadvertent invocation of the Cleanscreen command and how to enable two very important Pick- variables that may have mysteriously became disabled.
In my series on customizing buttons, this month I cover how to make a button so you can just click an existing object and turn it into a Revcloud. Pretty fun! Then in the opening article, I cover how to protect a drawing with a Password. Not something you encounter every day, but something that has come up in my training sessions on more than one occasion.
If you would like to contact me directly, you can do that also.
Blessings to one and all,
Michael
Drawing Encryption
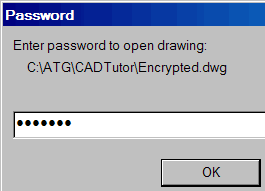
 I had a great question from my customer in Denver last week - prior to the defeat of their beloved and valiant Rockies - about a drawing password. Although you cannot prevent anyone from editing the content of your DWG file once it's open, you can at least require a password for them to open it.
Instructions to "Password Protect" a Drawing
- Open the drawing to be password protected, then go to the Open and Save tab of Options.
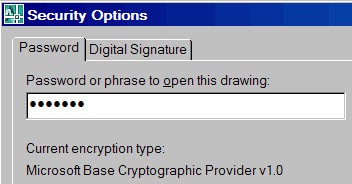
- Click the Security Options button in the lower left corner to open the Security Options dialog box.
- Enter a password for this drawing, then click OK. You will get another dialog box in which you re-enter the password.
Note: You better remember this password. You will NOT have a "Forgot Password" link like you do on all those websites that require a password - that you forgot. I would recommend making a backup copy of this drawing first… especially if you're forgetful.
- Be sure to include the password in any communication you have with the person you will be sending this drawing to. You may want to put it in the Notes section if you're using eTransmit (see Michael's Corner November 2005).
Additional Security Features
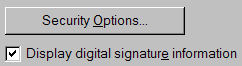
Digital Signature: Opens a dialog box where you can click a button to "Get a Digital ID" that takes you to the www.verisign.com website where you can sign up for a digital ID. If a digital ID is acquired for this drawing, the digital signature information will be displayed per the check box below the Security Options button on the Open and Save tab.
Encrypt Drawing Properties: If this box is checked (next to where you're specifying the password on the Password tab), the AutoCAD documentation states that a password will be required to read the Drawing Properties (File![]() Drawing Properties). I may have missed something, but I did not find this to be the case.
Drawing Properties). I may have missed something, but I did not find this to be the case.
Advanced Options: Displays a list of possible encryption providers, in case you wanted to select a provider other than the default RC4, Microsoft Base Cryptographic provider, v1.0.
Password in the current AutoCAD Session: Once you have entered the password for a drawing, you can open and close that drawing within the current AutoCAD session without being re-prompted. If you exit AutoCAD, then re-launch AutoCAD and open the drawing, you will be prompted for the password since it's a new AutoCAD session.
Password removal: After opening a drawing requiring a password, anyone can then open the Security Options dialog box (from Options) and delete the value displayed in the field for the password or phrase to open the drawing.
Power Tool
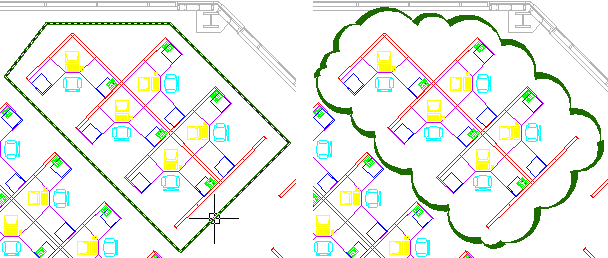
Custom Button #2: Revcloud from an Object
Last month we covered how to make a button on the palette that gave you a perfect revision cloud every time.
This month we're going to copy that button and add something to it so you can select an existing object - such as a rectangle, circle, or polyline - and turn that object into a revision cloud. I'm going to build on what we did in last month's article, so click here to go to the October 2007 article so you can catch up.
When converting an object to a revision cloud, you use the Object option of the Revcloud command and it goes like this…
Minimum arc length: 2′-0″ Maximum arc length: 6′-0″ Style: Calligraphy
Specify start point or [Arc length/Object/Style] <Object>: O
Select object: [Select the object to convert; note the backslash in the macro, below]
Reverse direction [Yes/No] <No>: [Press Enter for the default option]
Revision cloud finished.
Instructions to Automate the Object Option of Revcloud
- Open the palette containing your revision cloud button. [See October 2007]
- Right click on Revcloud button, then click . Right-click just below the Revcloud button, then click .
- Right-click the new Revcloud button, then click Properties.
- Change the Name to Revcloud - Object, then edit the Command String to read as follows (the additions for this month are in red):
^C^CREVCLOUD;A;24;72;S;C;O;\;
Here's what the additional characters mean:
; Presses Enter; it's easier to discern a semi-colon than a space when pressing Enter in a macro.
O The Object option of the Revcloud command. Yes, it's the default and you could have used a semi-colon to accept the default, but it's always a good habit to put the letter of the option being invoked, even if it's the default.
\ Backslash; Pause for user response.
Note: Whenever your command sequence requires that the user respond to the current prompt (as in the case of the process of converting an object to a Revcloud where you need to select the object), you must accommodate for that action but putting a backslash in the macro.
Next month: Automating UCS Align & UCS World
The Odd Spot
Cleanscreen… or Open a Drawing?
Across the top of your keyboard, have you ever noticed how close the zero key is - 0 - in relation to the letter O?
When you're in Word, or Excel, or AutoCAD, for example, and want to open a new file or drawing, you can use the Windows-compliant key combination of Ctrl + O for the Open command. But let's say you're in AutoCAD and you're in a rush and you reach a wee bit too far for the letter O and hit the zero… while holding down the Ctrl key.
That, my friend, will mess with your head. You have just invoked the "Cleanscreen" command and now the only AutoCAD features you see are the command line, the menus, the layout tabs, and the status bar. The title bar for AutoCAD, the toolbars, and the palette windows have been turned off.
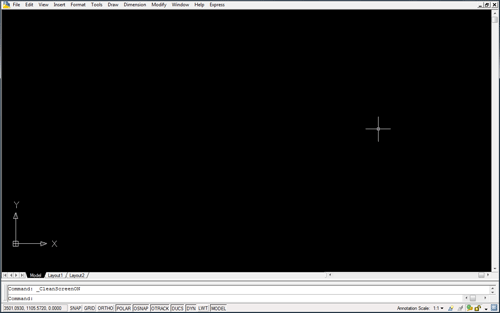
The good news: That process is a toggle; use Ctrl + 0 again and the toolbars and palettes come back.
Bonus points: Not that you would, but to toggle off the Command line itself, you can use Ctrl + 9.
The Basics
Pickadd & Pickfirst
 Over the last several months, I have received questions about certain situations and the answers need to be in your default collection of memorable variables.
Picky Variable #1 - When editing objects in AutoCAD (Move, Copy, Rotate, etc.), you are prompted to "Select objects". By default, you can select more than one object, then press Enter to complete your selection and continue on with the prompts of the command.
There may come a time when, as you are selecting objects, you select one object, then select another object and the first object selected is released. Although I can't isolate what may have caused that situation to occur, what I can tell you is that the variable PICKADD has, somehow, been turned off.
Solution: Enter PICKADD at the command line, then enter 1 to turn On the ability of adding objects to the selection set as you pick them.
Picky Variable #2 - By default, when you double-click, say, a circle, the Properties window opens. Double-click an attributed block and the Enhanced Attribute Editor dialog box opens. That ability is only available if the variable PICKFIRST is On. Another feature you may take for granted is the ability to click on any object, and the layer on which that object was created (or Inserted in the case of blocks or Attached in the case of Xrefs), is displayed in the Layer dropdown list.
Solution: If you are going along and double-click on an object and nothing happens or if you click on an object and the layer it was drawn on is not displayed in the dropdown list, enter PICKFIRST at the command line, then enter 1 to turn that feature On.
Left Field
Weather 101: The dew point - So my family and I were wondering just what the deal is with the dew point. Here's what we found out: The dew point is the temperature to which a given parcel of air must be cooled, at constant barometric pressure, for water vapor to condense into water. The dew point is a saturation point. The dew point is associated with relative humidity. A high relative humidity indicates that the dew point is closer to the current air temperature. If the relative humidity is 100%, the dew point is equal to the current temperature. Given a constant dew point, an increase in temperature will lead to a decrease in relative humidity. So now ya know. OK, back to work.
Donate to CADTutor
If you found this article useful, you might like to consider making a donation. All content on this site is provided free of charge and we hope to keep it that way. However, running a site like CADTutor does cost money and you can help to improve the service and to guarantee its future by donating a small amount. We guess that you probably wouldn't miss $5.00 but it would make all the difference to us.
Note from Michael: I want to thank all of my customers for continuing to retain my training services (some for over three decades!) and let you know your donations do not go to me personally, but to the ongoing maintenance of the CADTutor ship as a whole and to support the yeoman efforts of my friend and CADTutor captain, David Watson, to whom I am grateful for this monthly opportunity to share a few AutoCAD insights.
Share this page:


The Basics
- Dual Dimensions in a Dim…
- UCSICON Options
- "Best of" Basics: Irreg…
- Tool Palette Basics
- Original Dimension Value
- Possible Solutions to th…
- Avoid Using 'Standard' i…
- Shorten the Plot Scales…
- Update the Source File B…
- User Increment Angles fo…
- Drawing Information
- 'Sign Language'
- Rotate with the Copy Opt…
- Use the INSERT Osnap on…
- To or From the Current L…


