

 Michael’s Corner #29
May 2005
Filters and Settings
In an effort to find a few bright spots in the Layer Properties Manager introduced in AutoCAD 2005, this month I look at a couple workable features in the Filter Tree side of that dialog box. And since very few of us work in a vacuum, somewhere along the line you will receive a drawing using a different plot style table than yours. There's a very simple solution to that. There's also a very simple solution to drawing and editing objects without using @distance<angle for angular cursor motion. Take a look.
If you would like to contact me directly, you can do that also.
Blessings to one and all,
Michael
Effective Xref Layer Filter
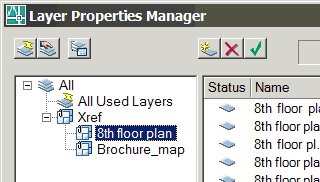 The list of layers in an Xref can be annoying. Use this procedure to shorten up the list in the Layer Control dropdown list on the AutoCAD 2005/2006 Layers toolbar.
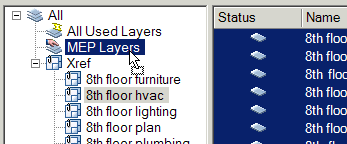
Instructions to hide Xref layer names
- In the Layer Properties Manager, expand the Xref node in the Filter Tree area of the dialog box (the left side).
- Click the name of the Xref to display only the layers of that Xref in the layer list.
- At the bottom of the dialog box, check the box for Invert Filter to display the layers that are not associated with the Xref. Confirm the box for Apply To Layers Toolbar is also checked.
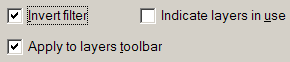
- Click OK to close the Layer Properties Manager, then take a look at the Layer dropdown list. The only layers you see are the ones not in the Xref!
Muliple Xref Tip: For drawings containing multiple Xrefs, click the "Xref" to display the all of the layers associated with the Xrefs.
Note: To see all the layers in the Layer Properties Manager, clear the Invert Filter check box, then click on the All node in the Filter Tree listing.
Power Tool
Layer Group Filters
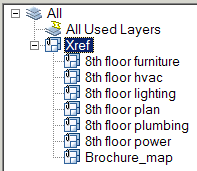
 Unfortunately, the Xref layer filter described above is only effective in suppressing the layers of all Xrefs in a drawing that contains multiple Xrefs. So, what if you only want to suppress the layer display of some of the Xrefs? For those of you with AutoCAD 2005 and AutoCAD 2006, the optimum method is to create a layer Group Filter.
A layer group filter is essentially a subset of layers that you create by dragging the selected layers into the Group name.
Note: Before you start this procedure, make sure you have cleared the check box for Invert Filter.
Instructions to create a layer Group of multiple Xref layers
- In the Layer Properties Manager, expand the Xref node in the Filter Tree area of the dialog box (the left side) to display all of the Xrefs associated with the drawing.
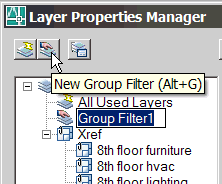
- At the top of the dialog box, click New Group Filter, then enter a name for this filter. In this exercise, I'll call it "MEP Layers".
- In the layer list, select the Xref layers you want to add to the Group filter. This can be done by selecting the specific Xref in the Filter Tree area, then selecting the layers in the list, or just by using Windows-compliant methods to make the layer selection in the list.
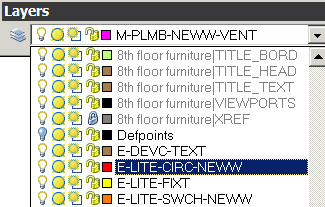
- After selecting the layers, click and drag the selected layers from the list directly onto the Group node in the filter tree.
- After building the Group filter from the layer selections, click on the Group name to display the layers in the list.
- Now click the Invert Filter check box to display layers that are not in the Group!
The Odd Spot
Converting Plot Style Tables
 Giving credit where due, I first heard about this a couple years ago from a friend of mine that works in the Facilities Department at Southwest Airlines. Since AutoCAD 2000 came out, there are two types of plot style tables; Named plot style tables (.STB), and Color plot style tables (.CTB)… and they don't play well with one another. You can't select a .CTB plot style if the drawing was originally created using .STB styles.
STB > CTB
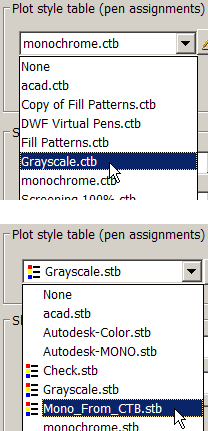
To convert a drawing currently configured for .STB styles to be able to read your .CTB files, type Convertpstyles, at the command line. You get a warning dialog box advising you of the conversion logistics. Now when you check the Plot Style Table dropdown list in the Page Setup or Plot dialog box, you see .CTB styles.
CTB > STB
Prior to converting your .CTB to Named plot style tables, I would back up all of them. To make the conversion, use Convertctb to convert .CTB files to .STB equivalents.
A dialog box appears in which you select the name of one .CTB file to convert. After selecting the .CTB file for conversion, you get another dialog box in which you specify a name for the new .STB file (it presumes the name of the original .CTB). After the conversion, in the Plot Style dropdown list you will notice that the .STB files that were converted are indicated by a colorful icon beside them. Isn't that nice.
The Basics
Additional Polar Angle Settings
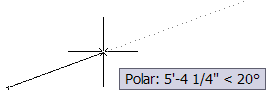
 The setting for Polar tracking is similar to an Ortho setting, but in angles other than 90 degree increments. The angle(s) specified for Polar assist in snapping your cursor movement to an angular increment, like 45 or 30 degrees. The Polar tracking can be used when creating geometry such as lines and polylines, as well as when you are editing with the Move or Copy commands.
Although there are several pre-specified angles available for polar tracking, here's how you can add your own.
Instructions to create additional polar angles
- On the AutoCAD status bar, right-click on Polar, then click Settings to open the Drafting Settings tab on the Polar Tracking tab.
- Check the box for Additional Angles, then click New and enter some new angles.
Note 1: When using Additional Angles, AutoCAD does not treat the value as an increment but as a singular angle value. Therefore, for angles at 10 degree increments, you must enter each one.
- After entering your additional angles, be sure to check the box at the top for Polar Tracking On, then click OK.
- Begin the Line command and specify the first point.
- Move your cursor in the general direction of an additional angle value and you will see a tool tip indicating the distance and the angle of the line.
Note 2: Contrary to using Ortho, with Polar you only have about a 2 degree range of cursor movement before polar tracking is released.
Note 3: When the Additional Angles box is checked, Polar tracking displays a tool tip for each of those angles in the list, as well as the default angle value currently displayed in the dropdown list.
BTW… Ortho and Polar cannot be on at the same time.
Donate to CADTutor
If you found this article useful, you might like to consider making a donation. All content on this site is provided free of charge and we hope to keep it that way. However, running a site like CADTutor does cost money and you can help to improve the service and to guarantee its future by donating a small amount. We guess that you probably wouldn't miss $5.00 but it would make all the difference to us.
Note from Michael: I want to thank all of my customers for continuing to retain my training services (some for over three decades!) and let you know your donations do not go to me personally, but to the ongoing maintenance of the CADTutor ship as a whole and to support the yeoman efforts of my friend and CADTutor captain, David Watson, to whom I am grateful for this monthly opportunity to share a few AutoCAD insights.
Share this page:


The Basics
- Dual Dimensions in a Dim…
- UCSICON Options
- "Best of" Basics: Irreg…
- Tool Palette Basics
- Original Dimension Value
- Possible Solutions to th…
- Avoid Using 'Standard' i…
- Shorten the Plot Scales…
- Update the Source File B…
- User Increment Angles fo…
- Drawing Information
- 'Sign Language'
- Rotate with the Copy Opt…
- Use the INSERT Osnap on…
- To or From the Current L…


