

 Michael’s Corner #63
March 2008
Just Call 'Em “Tenured”
Fields are relatively new to AutoCAD, but this month I also cover three other commands that have some tenure in AutoCAD. From a dusty bin on your tool bench, the Global Attribute Edit routine can be really useful when working with attributed blocks. And once upon a time, when dialog boxes were in their infancy, just about every procedure was command line-driven… and occasionally they creep back into our daily grind and need to be put back in their place. Cmddia and Filedia, specifically. And finally, one of my favorites, the powerfully functional utility of tiling the drawings so you can copy objects from one drawing to another in a snap.
I hope these insights bump your productivity a bit today so you can have a few more minutes with your family or favorite activity.
If you would like to contact me directly, you can do that also.
Blessings to one and all,
Michael
Global Attribute Edit (aka Gatte)
As many of you know, the contract furniture industry is - essentially - my customer base. Consequently, the drawings I encounter are full of attributed blocks; some with visible tags, some without. In my occasional coverage of the Block Attribute Manager [October 2006 and August 2007], you will see that Battman addresses the attribute related elements of the block definition, and to a lesser extent, the elements of the block references throughout the drawing (see May 2003 for the specifics on those block terms).
However, when you need to change the attribute value of several blocks at once - globally or by way of a selection set - the Global Attribute Edit command (GATTE) is a wonderful tool. Curiously, Gatte can only be accessed as a keyboard command (which naturally begs to be added to a toolbar or a button on a palette). It has been around for many years, dating back to one of the original Bonus routines in Release 14, I believe.
You can use Gatte to change the value of any attribute tag in an attributed block. In the following example, I'm using it to change the tag for several selected worksurfaces.
Instructions to Change the Values of a Visible Attribute
- Type GATTE, then press [Enter] and you see the following prompt:
Select block or attribute [Block name]: - Select the attribute tag of the block and you see the following prompt:
Enter new text:
Note: If you click on something other than that block's attribute (or if there is no visible tag), you will see a list of the known tag names for that block. In this example I have selected an attributed furniture block available from the CAP Designer program (see www.2020technologies.com for more information on this program).
Known tag names for block: CAPGC CAPTG CAPDH CAPQT CAPMC CAPMG CAPPN Select attribute or type attribute name:
At this point, you can either enter the tag name for which you want to change the value, or click on the attribute if you missed it the first time.
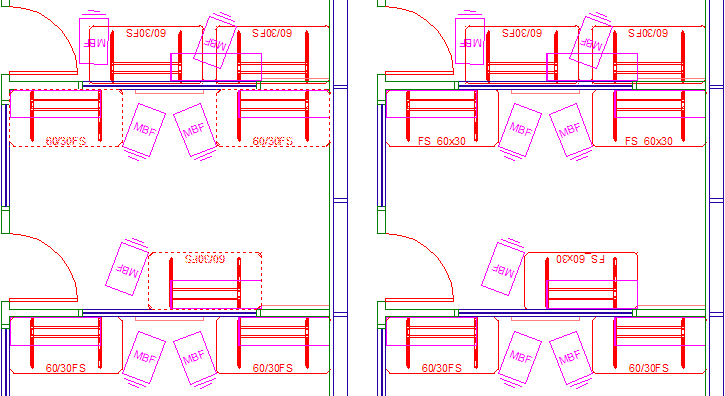
- Enter the new text for the attribute value, then press [Enter]. After entering the new text, AutoCAD will tell you how many of those blocks are in the drawing, and give you an option to change all of them. If you say No, you are given the prompt to Select Objects, as shown in the first illustration where I have selected three worksurfaces for the attribute change. The second illustration shows the changes on those worksurfaces only.
Enter new text: FS_60x30
Number of inserts in drawing = 266 Process all of them? [Yes/No] <Yes>: N
Select objects:
Please wait...
3 attributes changed.
Power Tool
Custom Button #5: Plot stamp Field on a Palette
I have the most wonderful customers. My friends at Yum! Brands in Louisville came up with this idea so I wanted to pass it along. Some of you may have drawings that you just need to plot from Model Space. To save yourself the trouble of remembering what the drawing name is after it's plotted, add a Filename field to the drawing before you print it! [See July 2005 and August 2005 to learn the fundamentals of Fields.]
To review, the four things you can put on a tool palette are Blocks, Commands, Hatches, and Macros. The Filename field doesn't fall under any of those headings… but you can turn it into a Block. To that end, it's important that you add the Filename field to a dedicated block source file since blocks on a palette are "linked" to the drawing from which they came. For specifics on the importance of the source file, see March 2006, Basics.
Instructions to Add a Filename Field to the Tool Palette
- Begin a new drawing and name it. This will serve as the source file for the block. I'll name mine CT_March08_Source.DWG.
Note: The field text is displayed in the current text style and will be added to the current layer, so make the necessary arrangements.
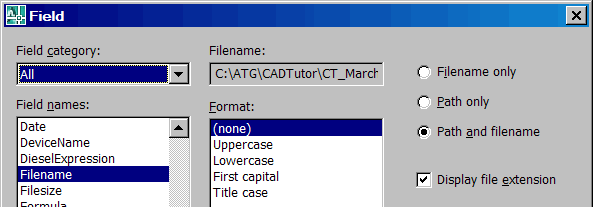
- Click Insert
 Field, then from the list of field names, click Filename. Make the desired selection for the Format - I'm leaving mine in the default format of (none) - then click OK.
 - To adjust the field height before you place it, enter H for the Height option and enter the desired height for the text. If the field position is difficult to control, you probably have Ortho on. Turn it off, then click to place the Filename field.
By default fields have gray backgrounds so you can visually distinguish them in a drawing. I would recommend you leave them that way, but if you would rather disable that background feature, you can do so in Options![]() User Preferences under Fields.
User Preferences under Fields.
- Launch the Block command and create a block from the Filename field. For the name, I'm using Field_Filename_MS to distinguish it from a block I may want for Paper Space applications.
- After making the block, save the drawing.
- Open the Tool Palette window and open the desired palette for the block.
- Click on the filename block, the click and drag it onto the palette.
- If you think you'll need to be rotating it so it reads vertically in certain drawings, right-click on the block on the palette, then click Properties. Set the property of Prompt For Rotation to "Yes", then click OK.
- To test it, open any drawing, then click the block on the palette, move into the drawing, then click to place it!
My thanks to Dan and Beth for this great idea!
The Odd Spot
CMDDIA vs. FILEDIA
This doesn't happen very often, but occasionally I hear from people regarding dialog boxes not opening when you expect them to. There are two variables that relate to dialog boxes: CMDDIA and FILEDIA. Both of these need to be set to <1>. If the Filedia variable is set to <0> and you launch the Save command, you will need to enter the desired path and filename at the command line.
Command: save
Save drawing as <C:\ATG\CADTutor\CT_March08_Source.dwg>:
Although the Express tool (A2006 & A2007) of Lman, the Layer Manager, has been phased out in deference to the Layer States Manager beginning in AutoCAD 2008, if you still have those versions and the Layer Manager dialog box is not opening, then you’ll want to set the Cmddia variable to <1>.
The Basics
Tile Vertically
When you have objects in drawing A that you would like to get into drawing B, there are a number of ways by which you can accomplish that, but one of the really fun ways is to just drag 'em.

A few months back (September 2007, Power Tool) I covered how to copy objects from one drawing to another using Copy with Basepoint, but the method illustrated this month can be used if you just need to get the objects into the other drawing quickly and easily.
Note: The following procedure will only work if you have NOT minimized a drawing. If you want to cycle between open drawings, use Ctrl + Tab. This retains their maximized condition which will enables the drawing to be tiled.
Instructions to Drag Objects between Tiled Drawings
- Open one of your drawings, then open a new, blank drawing.
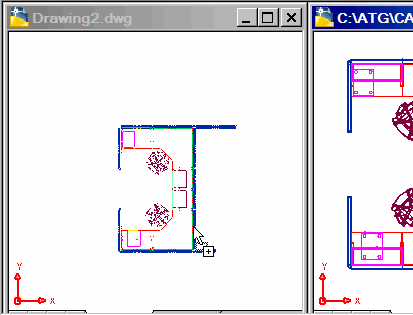
- Click WindowTile Vertically. This will split the drawing environment to display the two drawings.
- Select some objects in your drawing. If you have selected less than 100 objects, you will see their grips (see OptionsSelection under Grips).
- To drag the selected objects into the other drawing, click on a highlighted line of the selected objects (NOT in a grip), then drag it into the other drawing, and release.
Left Field
De name of Denim - Although Levi Straus made 'em famous by making the durable jeans for the 1849 California gold miners, the word "denim" comes from "de Nimes", Nimes being the town the fabric was originally produced
Donate to CADTutor
If you found this article useful, you might like to consider making a donation. All content on this site is provided free of charge and we hope to keep it that way. However, running a site like CADTutor does cost money and you can help to improve the service and to guarantee its future by donating a small amount. We guess that you probably wouldn't miss $5.00 but it would make all the difference to us.
Note from Michael: I want to thank all of my customers for continuing to retain my training services (some for over three decades!) and let you know your donations do not go to me personally, but to the ongoing maintenance of the CADTutor ship as a whole and to support the yeoman efforts of my friend and CADTutor captain, David Watson, to whom I am grateful for this monthly opportunity to share a few AutoCAD insights.
Share this page:


The Basics
- Dual Dimensions in a Dim…
- UCSICON Options
- "Best of" Basics: Irreg…
- Tool Palette Basics
- Original Dimension Value
- Possible Solutions to th…
- Avoid Using 'Standard' i…
- Shorten the Plot Scales…
- Update the Source File B…
- User Increment Angles fo…
- Drawing Information
- 'Sign Language'
- Rotate with the Copy Opt…
- Use the INSERT Osnap on…
- To or From the Current L…


