

 Michael’s Corner #103
July 2011
Software Fireworks!
A portion of this month's content was written while I was down in the Dutch Caribbean presenting training for the UTS Training & Development Center in St. Maarten. What a joy and a blessing to be invited down there and the hospitality shown to me by the Center's managers, David & Christine McGregor was positively delightful. My 36 students were pretty great, too, I must say.
This month I wanted to tackle the new AutoCAD 2012 Array feature and at least give you some starting points. So in the fashion of the 4th of July, I'll light the ‘fuse of interest’, and my suspicion is you will all have your own colorful ideas on how to apply these insights:
…Creating and adjusting an Associative rectangular array
…Using the multifunction grips and the contextual tab to edit the Associative array
…Mechanics of editing a source object in an Associative array
…Editing stacked fractions in Mtext (I know, totally random)
I sure hope you all have as much fun with these tips as I did discovering them, and I hope you have a safe summer holiday!
If you would like to contact me directly, you can do that also.
Blessings to one and all,
Michael
AutoCAD 2012's Associative Array
 OK, this is classy. So, back in the day, AutoCAD LT had the Array dialog box a full version before it was included in the ‘big dog’. And although the Array dialog box has been sufficient for the last several versions, somebody decided that it needed an overhaul… and they brought their ‘A’ game. It should be a candidate for ‘Trick your Command’ or something equally cool. The Array routine is now associative (think dimensions with grips, and when you edit an associative array, it comes wrapped in a contextual tab with a side of multifunctional grips (covered in this month's Power Tool).
To unpack this critter, we'll do a simple rectangular array to point out the various features, and you can take it from there.
How to Create an Associative Array
Create a rectangle with the dimensions of 1.5″ x 3.5″.
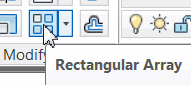
On the Modify panel [Home tab], click Rectangular Array, then select the rectangle and press [Enter]. Move your cursor in any direction to view the dynamic placement of the rectangles.
To create a simple line of rectangles, albeit with specific values, complete the prompts as shown below:
Specify opposite corner for number of items or [Base point/Angle/Count] <Count>:BSpecify base point or [Key point] <centroid>:Pick the lower left corner of the first rectangleSpecify opposite corner for number of items or [Base point/Angle/Count] <Count>:Press [Enter] for the <Count> option.Enter number of rows or [Expression] <4>:1Enter number of columns or [Expression] <4>:8Specify opposite corner to space items or [Spacing] <Spacing>:[Enter]Specify the distance between columns or [Expression] <2 1/4">:6Press Enter to accept or [ASsociative/Basepoint/Rows/Columns/Levels/eXit] <eXit>:[Enter]
But wait, there's more!!

After completing the Array command, when you click on one object in the array, the entire array is highlighted and you see — in order of appearance — (1) multifunction box grip, (1) arrow grip, and (1) multifunction arrow grip.
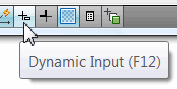 In this exercise, you adjust the spacing between items and the quantity of items in the array using grips. This exercise also takes advantage of the Dynamic Input mode, available on the Status bar.
How to Adjust an Associative Array
Enable the Dynamic Input feature, then click on one of the rectangles of the array created in the previous exercise to display the three grips.
-
 To change the spacing between each item in the array, click the arrow grip displayed on the 2nd item in the array to display the current spacing.
 Type 10 for the new distance between items, then press [Enter]. As you may have noticed, you can also manually adjust the spacing.
-
To decrease (or increase) the total number of items in the array, click the arrow at the end of the array to display the current number of columns.

Enter the desired number of columns for the array, then press [Enter]. You may also simply move your cursor to dynamically display the column count.
That is just the tip of the Array iceberg, but hopefully you now see the potential of this newly updated command.
Note: To disassociate the items in an associated array, use Explode.
Power Tool
Multifunction Grip and Contextual Tab for Arrays
In addition to the associativity features of the A2012 Array command, the multifunction grips and a contextual tab also contribute to its effectiveness.
Continuing from the above exercises, this sequence steps you through increasing the Row count using the multifunction grip and specifying the distance on the contextual tab.
How to Adjust the Row Count and Spacing of an Associative Array
 Continuing from the above exercises, click on any object of the array to display the grips and the contextual tab.
Hover in the box grip (don't click, just hover in it) to display the shortcut menu, hence the term "multifunction grip".
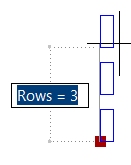 Click Row Count, then move your cursor to see the dynamic display of the rows (or enter 3 in the dynamic edit box). Click to anchor the position of the 3 rows of rectangles.
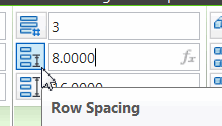 On the contextual Array tab, Rows panel, enter 8 for the Row Spacing value and you will see the distance between rows — the distance between similar points on each rectangle — shift to 8 units.
The Odd Spot
Modifying the Source Object in an Associative Array
 Rounding out the top 3 Need-To-Know bits about rectangular arrays, here's something that's more unique than odd: the ability to modify one object in the array as the ‘Source’ object, then have the modification reflected on all instances of that object in the array.
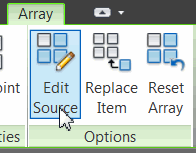
How to Edit the Source Object in an Array
Continuing from the above exercises, click on any object of the array to display the grips and the contextual Array tab.
On the Options panel, click Edit Source.
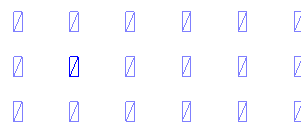
Click any rectangle in the associative array and you will get a notice about editing the source object; click OK.
-
 You may now edit the selected source object, so draw a diagonal line across the rectangle… and when you have finished drawing that line, every instance of the rectangle in the array displays the edited condition!
 Click Save Changes on the contextual Edit Array panel and you're good to go!
The Basics
Stacking Fractions in Mtext
Depending upon the need — or your eyesight — automatic stacked fractions can be unexpected and/or unwanted. My buddy Serge, Design Manager at American Office, was asking me about this recently so I thought I'd take this up this month.
How to Specify and Adjust Stacked Fractions
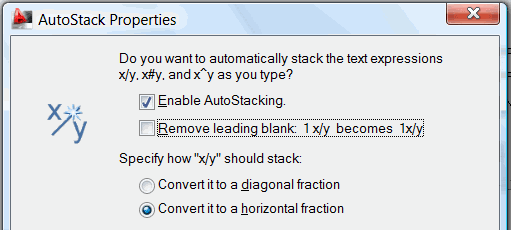
 Launch Mtext, then enter the first line of text shown here and you will probably get the AutoStack Properties dialog box shown, above.
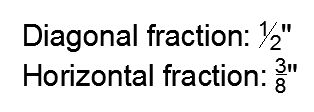
In the lower portion of the dialog box, notice the two options of stacking — Diagonal fraction or Horizontal fraction.
Click the radio button for the desired stack condition, then click OK to close the AutoStack Properties dialog box and your fraction will reflect your decision.
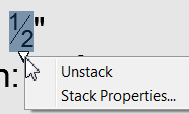
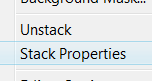 To disable the stacking of fractions in Mtext — possibly because it is too difficult to discern — highlight the fraction (be careful not to include the inches or feet sign, if they're present), then right-click to display the shortcut menu.
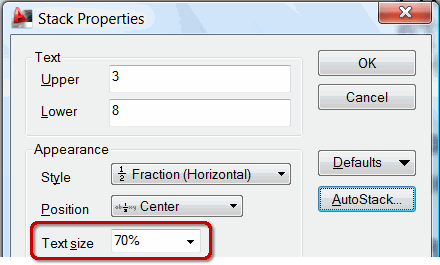
The option to Unstack is pretty intuitive, but what about Stack Properties? In addition to changing the value of the Upper and Lower text values, you can also specify the Style, Position, and possibly more importantly, the percentage of the height of the fraction numerals in relation to the text itself (Text Size).
 AutoCAD 2012 Note: I noticed that in A2012, when you're in the Mtext Editor, after highlighting the fraction to edit, if you click on the highlight, a small white down-arrow displays. Click on that arrow (not right-click), then choose the desired option. Nice.
Left Field
The Seafaring Eight-Legged Wonder:
Cephalopods have one central systemic heart and two brachial hearts, according to the medical journal, The Lancet. The dominant heart supplies blood to the body, while the other two bring it to the gills for oxygenating (similar to how the right side of the human heart pumps blood to the lungs). Unlike humans, however, octopuses bleed blue, as their circulatory systems use hemocyanin — a protein that contains copper — rather than iron-rich hemoglobin, to bind oxygen.
Courtesy of Southwest Airlines Spirit magazine, May 2011
Donate to CADTutor
If you found this article useful, you might like to consider making a donation. All content on this site is provided free of charge and we hope to keep it that way. However, running a site like CADTutor does cost money and you can help to improve the service and to guarantee its future by donating a small amount. We guess that you probably wouldn't miss $5.00 but it would make all the difference to us.
Note from Michael: I want to thank all of my customers for continuing to retain my training services (some for over three decades!) and let you know your donations do not go to me personally, but to the ongoing maintenance of the CADTutor ship as a whole and to support the yeoman efforts of my friend and CADTutor captain, David Watson, to whom I am grateful for this monthly opportunity to share a few AutoCAD insights.
Share this page:


The Basics
- Dual Dimensions in a Dim…
- UCSICON Options
- "Best of" Basics: Irreg…
- Tool Palette Basics
- Original Dimension Value
- Possible Solutions to th…
- Avoid Using 'Standard' i…
- Shorten the Plot Scales…
- Update the Source File B…
- User Increment Angles fo…
- Drawing Information
- 'Sign Language'
- Rotate with the Copy Opt…
- Use the INSERT Osnap on…
- To or From the Current L…


