

 Michael’s Corner #26
February 2005
Taking Advantage of the Power
Global updates, sweeping edits… and an idea on how to find that "lost drawing" on the Model tab. Once again, the features I cover this month are a result of questions and applications I encounter at customer sites.
Although editing an xref in-place is what many folks use Refedit for, it is also the "go-to" command if you need to globally modify block geometry. And rather than finding the distance between objects for an array, just pick the points graphically. Nobody said you had to have a number for the X and Y offset.
And finally, I continue to get questions and emails about drawings "disappearing" on the Model tab, but it looks just fine in the viewport on the Layout. While I was onsite in Colorado this week, I came up with something that I hadn't used in years that may solve that problem with the "mystery dots" on the edges of the drawing. I'd be interested in hearing how any of you solve that problem, too.
If you would like to contact me directly, you can do that also.
Blessings to one and all,
Michael
Refedit for Blocks
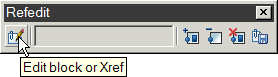 The fact that the Refedit command can also edit blocks is frequently overlooked. More commonly known as the method by which to edit an xref while in the host, the Refedit command is a powerful way to make one-off edits to all references of a block in a drawing. You can access the command from the Refedit toolbar, the Modify menu, or the shortcut menu of a selected block.

For example, you have created a tool palette containing your favorite architectural blocks. One of the door blocks, however, needs to be graphically emphasized. Using Refedit, you select one of these doors and make the necessary edits. When you complete the Refedit command by saving the changes back to the reference, all instances of that block are updated automatically.
Instructions to Update a Block Using Refedit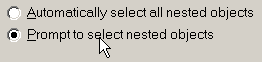
- Launch the Refedit command. Do not close the Refedit toolbar.
- Select the block reference to use as the 'guinea pig' on which you will be making the edits. This opens the Reference Edit dialog box. If you are using AutoCAD 2005, click the radio button for Prompt to Select Nested Objects. Click OK.

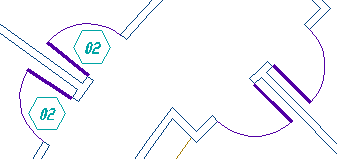
- Select the block geometry you want to edit. In this example, I'm selecting all the door geometry. After selecting the necessary objects, press ENTER and the objects not selected for editing are faded by 50%.
[See this month's challenge if you know what variable governs that percentage.]
- Make the necessary changes to the selected objects. In this example, I'm adding a Solid hatch to the door.
- On the Refedit toolbar, click Save Back Changes to Reference, then click OK at the alert regarding all references.
Your drawing updates all instance of the edited block with the changes. The original block from the tool palette is not effected by this procedure, just the references in the current drawing.
Power Tool
Array by Example
When creating a rectangular array, you can graphically specify the X and Y values using an existing pattern.
Instructions to Graphically Specify the Rectangular Array Offset
- Launch the Array command (Modify
 Array), then click the Select Objects button and select the objects to be arrayed.
 - Specify the number of Rows and Columns.
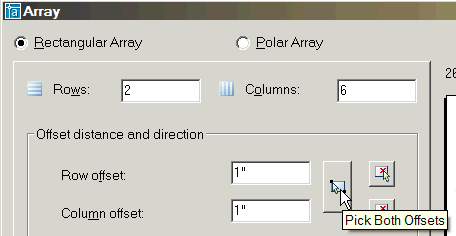
- Click the Pick Both Offsets button.
- Pick the diagonally opposed points that define the spacing as well as the direction for the pattern. As shown in the example, the pattern from point 1 to point 2 indicates the array is to be created up and to the right.
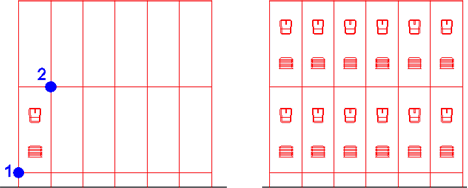
Note: When picking the two points for the offset, the points specified can be anywhere in the drawing.
Specify the number Columns and Data Rows you would like, then click OK to close the dialog and return to the drawing where the upper left corner of the table is attached to your cursor.
The Odd Spot
Qtext for Mystery Dots
Have you ever clicked on the Model Space tab, then did a Zoom Extents… and the drawing is gone? You probably have "floaters" or those mystery dots that hang out on the periphery of the screen; one on the top or left and the other(s) at the bottom or on the right. One of them is actually your drawing, the rest of them have been flung to the far reaches of who knows where.
Possible Reasons for Why…
The basepoint of a block was not specified. When creating a block in that drawing, the basepoint may have been left at 0,0, rather than specified on a more useful location. Most of the mystery dots I encounter turn out to be blocks with or without attributes.
No-text text. Another guilty party is the piece of text that somehow contains only a space.
Right-click when moving or copying an object. It may occasionally happen that when moving or copying an object, instead of left-clicking to pick the second point of displacement, a user may inadvertently right-click. This causes the default <use first point as displacement> option to be used, shooting your object off in an upper-right direction. Essentially, this option takes the coordinates of the base point and doubles them. So, if your basepoint is at 1000,1000, the moved object will end up near 2000,2000 and possibly way off screen.
How To Find the Dots…
When searching for objects that can't be seen, you usually zoom out a bit, then start windowing areas in an effort to display the grips of the objects on the edge. Two things that will help in that effort:

- In Options, at the bottom of the Selection tab, change the setting for the grip Object Selection Limit to some big number, otherwise, if you do window a bunch of stuff, the grips won't display.
- Set the variable QTEXT to <On>, then regenerate the drawing. This variable goes way back to the days of 286 computers when drawings containing lots of text would regen very slowly, especially if you had a complex font. The Qtext variable displays all text objects - dtext, mtext, attribute text, and dimension text - as a box. With the Qtext variable On, you may now be able to see text objects that have no text.
Once you have found those objects on the edge, use the Move command and move them a closer to the other dots. At least this way, when you do a Zoom Extents, you'll be able to see the objects.
The Basics
Polar Snap
 Where Ortho is great for 0, 90, 180, and 270 drawing and editing, the Polar setting provides a method for you to draw at an angle. Standard angles including 45 and 30 can be selected, or you can create your own.
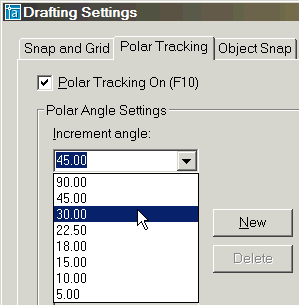
Instructions to Set and Use an Increment Polar Angle Setting
- Right-click on the Polar button on the status bar and click Settings to open the Polar Tracking tab of the Drafting Settings dialog box.
- Click in the Increment Angle drop down list and select the desired angle. For this example, I'll choose 30.
- Put a check in the Polar Tracking On check box, then click OK. (You can also toggle Polar on and off with F10.)
- In the drawing area, begin the Line command, then click a start point.
- Move the cursor in any 30 degree angle and you'll see a tool tip and a dotted line along the vector you're moving the cursor.
- To draw a specific length at that angle, simply enter the distance and press [ENTER].
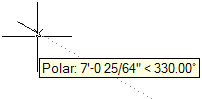
Heads-up: Unlike Ortho, the Polar tracking feature doesn't lock your cursor into an angle until you move around to the next incremental angle value. If you 'drift' from the displayed angle by a couple degrees, you lose the polar angle tracking and the tool tip and dotted vector will be released.
Note: If you toggle on Ortho (F8), Polar will automatically turn off since they cannot both be on at the same time.
Donate to CADTutor
If you found this article useful, you might like to consider making a donation. All content on this site is provided free of charge and we hope to keep it that way. However, running a site like CADTutor does cost money and you can help to improve the service and to guarantee its future by donating a small amount. We guess that you probably wouldn't miss $5.00 but it would make all the difference to us.
Note from Michael: I want to thank all of my customers for continuing to retain my training services (some for over three decades!) and let you know your donations do not go to me personally, but to the ongoing maintenance of the CADTutor ship as a whole and to support the yeoman efforts of my friend and CADTutor captain, David Watson, to whom I am grateful for this monthly opportunity to share a few AutoCAD insights.
Share this page:


The Basics
- Dual Dimensions in a Dim…
- UCSICON Options
- "Best of" Basics: Irreg…
- Tool Palette Basics
- Original Dimension Value
- Possible Solutions to th…
- Avoid Using 'Standard' i…
- Shorten the Plot Scales…
- Update the Source File B…
- User Increment Angles fo…
- Drawing Information
- 'Sign Language'
- Rotate with the Copy Opt…
- Use the INSERT Osnap on…
- To or From the Current L…


