

 Michael’s Corner #25
January 2005
AutoCAD 2005 Table Review
We have Dimension Styles, Text Styles, and AutoCAD 2005 introduced tables which are optimally implemented by defining a Table Style. Similar to styles relating to text and dimensions, a table style defines the parameters of the table. Tables are great for any number applications: Parts lists, Bill of Materials, Legends, and imported Excel files.
In this month's column, I present a few of the key procedures and features of a Table.
If you would like to contact me directly, you can do that also.
Blessings to one and all,
Michael
Table Style Setup Features
A Table has three parts: The Title cell, the Column Head cells, and the Data cells. Most of the action happens in the Data cells, of course, and you can opt out of the Title and/or Column Heads if all you need is a matrix of data.
 The first step is to name a New table style, then specify the style parameters in the New Table Style dialog box.
Make a new Table Style
- From the Styles toolbar, click the Table Style Manager button to open the Table Style dialog box.
- Click the New button and enter a name for the table style, then click Continue to open the New Table Style dialog box.

After naming the table style, you configure the various properties for the Data, Column Heads, and Title cells. There is a tab for each of the three cell areas. As shown here, each area can have a separate text style assigned to it.
 The property information is the same on all three tabs, with the exception of the 'Include Header Row' and 'Include Title Row' check boxes on those respective tabs.
Configuring the properties for the Data, Column Heads, and Title
Cell Properties area
Make the desired edits to the Cell Properties, including the selection of a text style. If you would like to make a new text style, click the ellipsis button to open the Text Style dialog box.
The default text height presumes you will be inserting the table into a Layout. Make the necessary changes if your table is going into Model space.
The Text Color and Fill Color can be specified in this area, both of which are dependent upon your output device.
Tip: Set the Alignment to Middle Center for the Data cell properties and it will transfer to the Column Heads and Title cell properties, too.
Border Properties area
Specify the Grid Lineweight first, then click the button for the lineweight application.
Note: The Grid Lineweight only displays when the LWT button is pushed in on the Status bar.
General area
When you have a table in which revision numbers are logged, it may start from the bottom just above the title block and build up. That is the intent of the Table Direction option for Up or Down.
Cell Margins area
 The Horizontal and Vertical values are the nominal distances of "white space" around the text or block in each cell.
Note: Click the Modify button in the Table Style dialog box to make changes to the table style properties. If you have already placed a table, the modified properties will be applied to all tables using that style.
Click Close to save and close out of the Table Style dialog box.
Table Insert and Edit Features
To insert your table, click Table on the Draw toolbar (or select Draw![]() Table) to open the Insert Table dialog box.
Table) to open the Insert Table dialog box.

Note: Since the Column Width and the Row Height are editable once you have inserted a table, I don't typically modify the defaults.
Specify the number Columns and Data Rows you would like, then click OK to close the dialog and return to the drawing where the upper left corner of the table is attached to your cursor.
Table Editing Insights.
After specifying the placement of the upper left corner of the table, the Text Formatting toolbar appears at which point a cursor appears in the Title cell. Text in a table is Mtext.

If you…
Esc - The table remains and you can add table content later.
Enter text - The text will appear in the Title cell.
Press Tab - The cursor moves to each cell from left to right, in each row.
Use the Arrows - The cursor moves to each cell based upon the direction, stopping in the last cell of a row or column.
Cell Editing Insights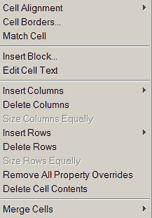
Double-click in a cell - This will display the Text Formatting toolbar and the cell goes to gray with a cursor. Right-click in the cell and the shortcut menu is essentially the same shortcut menu you get in the Mtext Editor. Text in the cell can then be edited as it would be in the Mtext Editor.
Single-click in a cell - Four grips appear on the cell by which the cell can be sized. The shortcut menu, however, has cell-related options.
 Insert Block - This option opens the Insert Block in a Table Cell dialog box. Select a block in the current drawing or click the Browse button and select a .DWG file.
Tip: Rather than setting the Cell Alignment to Middle Center with the insertion of each block, wait until you're finished inserting all the blocks, then select the entire row of blocks, then right-click and select Cell Alignment![]() Middle Center.
Middle Center.
Note: Leave the AutoFit feature checked since you can't apply that feature once the block has been inserted into the table.
Grip Tips for Tables
There are some very specific functions of the grips of a table. Copy this text and hang on to it for later use: Top left grip - Repositions the table. The Windows-compliant click/drag function available to edit most other drawing geometry cannot be used.
 Header grips - Each header grip adjusts the width of the associated column. By default, adjusting the column width changes the overall width of the table. To adjust the width of a column without changing the table width, click an interior header grip to select it, and press CTRL as you make the horizontal adjustment.
Lower left grip - Vertically adjusts the table height, maintaining the proportion of the rows in the table. The adjustment is limited only by the vertical cell margin setting of the table style and the cell text height.
Top right grip - Horizontally adjusts the table width proportionally. Adjusting the table with this grip may result in non-hyphenated text wrap in the cells.
Lower right grip - Diagonally adjusts the table height and width, maintaining the proportion of the rows and columns in the table.
Parting Comment...
In Excel, highlight and Copy several cells. In AutoCAD, select 'Paste Special', then select AutoCAD Entities from the list. This will bring the Excel content in as a table, although it will not adhere to the current Table Style properties.
Donate to CADTutor
If you found this article useful, you might like to consider making a donation. All content on this site is provided free of charge and we hope to keep it that way. However, running a site like CADTutor does cost money and you can help to improve the service and to guarantee its future by donating a small amount. We guess that you probably wouldn't miss $5.00 but it would make all the difference to us.
Note from Michael: I want to thank all of my customers for continuing to retain my training services (some for over three decades!) and let you know your donations do not go to me personally, but to the ongoing maintenance of the CADTutor ship as a whole and to support the yeoman efforts of my friend and CADTutor captain, David Watson, to whom I am grateful for this monthly opportunity to share a few AutoCAD insights.
Share this page:


The Basics
- Dual Dimensions in a Dim…
- UCSICON Options
- "Best of" Basics: Irreg…
- Tool Palette Basics
- Original Dimension Value
- Possible Solutions to th…
- Avoid Using 'Standard' i…
- Shorten the Plot Scales…
- Update the Source File B…
- User Increment Angles fo…
- Drawing Information
- 'Sign Language'
- Rotate with the Copy Opt…
- Use the INSERT Osnap on…
- To or From the Current L…


