

 Michael’s Corner #81
September 2009
Preparing for Autodesk University
My proposal for a Lab Session at this year's Autodesk University has been accepted and I figured my monthly column would be a fabulous venue to get prepared for that auspicious (and humbling) event. At this date, about 75 folks have signed up to be entertained… and will hopefully learn something along the way.
I take great comfort in knowing that my good friend from Southwest Airlines, Hugo Hernandez, has agreed to come and lend a hand as one of my Lab assistants for this 90 minute exercise. Joining Hugo will be Kate Morrical, Autodesk's Technical Marketing Manager for AutoCAD LT and author of the LT Unlimited blog. Shaan Hurley, endless traveler, photographer, fellow gastronome, and author of Between the Lines will also be assisting. All in all, it should be a real fun time.
This month in Michael's Corner I'm covering…
…How to add a Contextual Tab State.
…Assigning Quick Properties to F4.
…Another application for the curious, albeit powerful, variable DIMASSOC.
…Insights into the Autodesk Seek site.
Stop Press: As of the date of this posting, my AU2009 AutoCAD Toolbelt session is sold out! Yep, there are 85 of you out there who will be starting the first morning of Autodesk University with 90 minutes of edu-tainment from the AutoCAD Trainer Guy, and I promise to do my best to make it worth waking up for.
If you would like to contact me directly, you can do that also.
Blessings to one and all,
Michael
A2010 Ribbon: Contextual Tab State for Dimensions
The Ribbon-based Contextual Tab State feature of AutoCAD 2010 is a great asset and brings yet another Ribbon function to the table of productivity. I am also happy to say that the following procedure works in AutoCAD LT 2010, too!
First things first (and this is what I mentioned last month, too)…
Note: Since the Ribbon is directly associated with a Workspace, if you haven't done so already, I would (highly) recommend you save your current workspace. Then use Workspace Switching![]() Save Current As again and make a workspace that is exclusive to this exercise. I'm continuing with the workspace I created last month called Add a Tab & Panel.
Save Current As again and make a workspace that is exclusive to this exercise. I'm continuing with the workspace I created last month called Add a Tab & Panel.
Keep in mind the following phrase from the July 2009 introductory coverage on the Ribbon…
"Each tab contains multiple panels, and each panel contains multiple tools."
Instructions to Create a Contextual Tab State for a Dimension
 With your Workspace current, open the CUI from the Manage tab of the Ribbon, or just type CUI.
Navigate to Partial Customization Files
 CUSTOM, then expand the Ribbon node. [As I have mentioned on more than one occasion, the CUSTOM node is the optimum location for your customized menu components as these will be retained if/when AutoCAD needs to be re-installed or when you upgrade to the next version.]
Although we made our own custom tab last month, a Contextual Tab State is independent of other tabs, be they customized or otherwise.
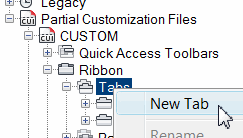
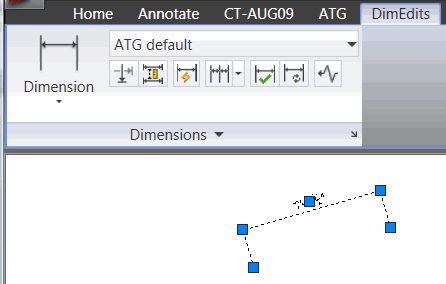
Under the Ribbon node, right-click on Tabs, then click New Tab and enter a name. In this exercise, I'm naming the tab DimEdits.
Under the Ribbon node, expand Contextual Tab States.
Now here's where it gets just a wee bit counter-intuitive.
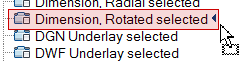 Drag your DimEdits tab down into the Contextual Tab States list and release it on Dimension, Rotated selected.
As you might suspect, you can drag your DimEdits Contextual Tab onto any or all of the Dimension-related states.
Click OK to save your changes and close the CUI.
To test your new tab assignment, create a Linear Dimension, then click on it. Your Ribbon should now display a tab reading DimEdits… that has no panels!
Per the Ribbon catch-phrase above, we will now need to add a panel to our DimEdits tab…
Instructions to Add a Panel to the Contextual Tab for Dimensions
Open the CUI, then at the top of the list under ACAD, expand the Ribbon node.
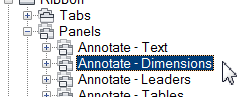 Expand Panels, then right-click on Annotate - Dimensions, then click Copy.
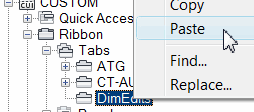 Down under Partial Customization Files, expand Ribbon, then Tabs, then right-click on your DimEdits tab and click Paste to paste the Annotation - Dimensions panel onto your tab.
Click OK to save your changes and close the CUI.
To test the addition of your panel, click on the dimension… and you'll see the Dimensions panel included on your DimEdits tab!
Power Tool
Quick Properties to F4
 Last month we customized the Quick Properties window, but admittedly, it can be annoying. For those of you who don't have a digitizing tablet (and some of you have no idea what that even is), how about we reassign the F4 function key to toggle On/Off Quick Properties?
Instructions to Assign ‘Quick Properties’ to F4
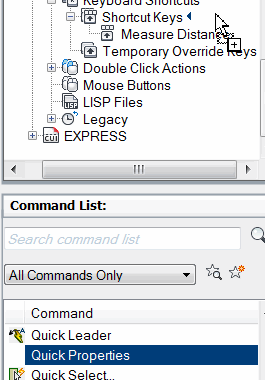
Open the CUI dialog box by typing CUI at the command line, or right-click on any button, then click Customize.
In the Customizations pane, expand Partial CUI Files, then expand Custom. Now expand the Keyboard Shortcuts node.
Under Command List, drag the Quick Properties command up into the Customizations pane and release it next to Shortcut Keys to add it to the listing. (If you have been following my column recently, you may also have Measure Distance or Quick View Drawings in that list, assigned to F1.)
Note: If the recently added command does not initially appear in the Shortcuts pane (in the upper right quadrant of the CUI), you may have to OK out of the CUI, then re-open it.
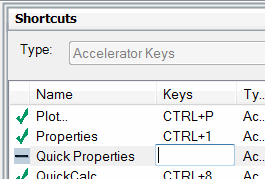 In the Shortcuts pane next to the Quick Properties command, click in the Keys column to display an edit box, then press F4 and press <Enter>. You should now see a green checkmark in the column preceding the Distance command name.
Click OK to close out of the CUI. You will now be able to toggle Quick Properties with F4, rather than going down and hitting the QP (or icon).
The Odd Spot
DIMASSOC
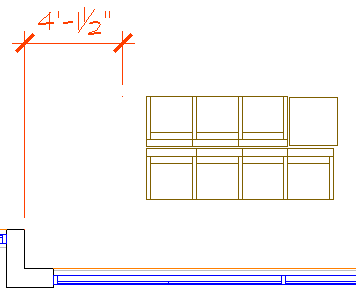 Have you ever had a dimension automatically update when you use Move to move one of the objects that was dimensioned… even if the dimension layer is Off or Frozen!? That'll mess with your head. This figure displays the result of moving the furniture if the dimension was created when the DIMASSOC variable was set to <1>.
Introduced back in A2002, the DIMASSOC variable can also used for dimensioning Model space objects in Paper space (something I do NOT recommend, but I did write about it back in July 2006).
History: Once upon a time, many of us would receive drawings where the ‘dimension’ was comprised of three lines, two solids (the arrowheads), and single line text. That was because someone had either Exploded the dimension… or the DIMASO variable was set to <0> when the dimension was created.
 These Days: Technically, DIMASO is still around, but uses On and Off as the settings. When DIMASSOC is set to <2> - the initial value - prior to adding the dimension, whenever you Move dimensioned objects, the dimension will automatically update, as shown in the second figure.
The Odd Bit: As I mentioned in the opening comment, even if the dimension layer is turned Off or Frozen (!), the dimension will update when the dimensioned objects are moved.
The Basics
Autodesk Seek
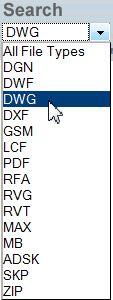
Regardless of your industry, I think you will find the content at Autodesk Seek to be quite useful. Billed as "The online source for product specifications and design files", this is where you can find content for the file types listed here.
 By way of example, I entered "aluminum" in the Search field and it returned 2533 entries - from door frames to skylights to expansion joint covers - just an enormous amount of data.
Insights for Accessing the Seek Content
Even if you set the File Type to DWG, you may still see a broader range of file types returned for your search.
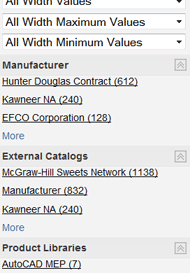
After entering the desired text to search, notice the extensive array of filters in the left pane, as well as several useful links to Manufacturers and Libraries below those.
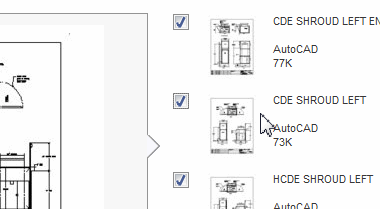
To download the content, click the Details link in the listing of file types.
Hover over the image of the drawing for a larger view.
Check the box for the drawing(s) to download, then click the Download Selected button at the top of the list.
After accepting the (to be expected) ‘Terms and Conditions’, your browser will probably prompt you to Save or Open the file being downloaded. I selected three drawings and the zip file contained all three.
I was a bit disappointed by the sparse return for "office furniture", but if you find yourself accessing the Sweet's Catalogs regularly, this site may be just what you're looking for.
Left Field
THAT explains it! Eating bread before dinner makes people lose their sense of fullness and people eat more.
Donate to CADTutor
If you found this article useful, you might like to consider making a donation. All content on this site is provided free of charge and we hope to keep it that way. However, running a site like CADTutor does cost money and you can help to improve the service and to guarantee its future by donating a small amount. We guess that you probably wouldn't miss $5.00 but it would make all the difference to us.
Note from Michael: I want to thank all of my customers for continuing to retain my training services (some for over three decades!) and let you know your donations do not go to me personally, but to the ongoing maintenance of the CADTutor ship as a whole and to support the yeoman efforts of my friend and CADTutor captain, David Watson, to whom I am grateful for this monthly opportunity to share a few AutoCAD insights.
Share this page:


The Basics
- Dual Dimensions in a Dim…
- UCSICON Options
- "Best of" Basics: Irreg…
- Tool Palette Basics
- Original Dimension Value
- Possible Solutions to th…
- Avoid Using 'Standard' i…
- Shorten the Plot Scales…
- Update the Source File B…
- User Increment Angles fo…
- Drawing Information
- 'Sign Language'
- Rotate with the Copy Opt…
- Use the INSERT Osnap on…
- To or From the Current L…


