

 Michael’s Corner #147
August/September 2016
Two…
OK folks, just to be clear, I'm not retiring from training, just from authoring Michael's Corner.
I'm having waaaaay too much fun traveling around the planet, meeting new Designers, seeing friends, eating at recommended restaurants. And the most satisfying part is knowing that I'm enabling my customers to be quicker, better, smarter, and faster.
The fate of Michael's Corner has yet to be determined, but I'm still going to be available for training on AutoCAD, CAP Designer, 20-20 Worksheet, Visual Impression, Z-Axis, Revit fundamentals, and next year, CET from Configura.
I will definitely miss this venue for posting AutoCAD tips & insights, but as many of you know, the CADTutor Forum, is ripe with answers to questions you didn't even know you had!
In this next-to-last Michael's Corner, we lift the hood to discover more about…
…Visual Style properties
…Practical applications for a named view
…How to flip back to Model Space with a macro
…Forcing layer colors to Black & White in a viewport
…Creating a dual-display Dimension style with Ft-In, as well as Inches
And for those of you who would like the last 14 years in book form (or PDF), YES, I am currently updating The AutoCAD® Workbench to include 'em all. The AutoCAD Workbench, Final Edition will be updated to A2017 and, “Lord-willing and the creek don't rise”, will be out in time for Christmas or sooner.
Keep up the good work!
If you would like to contact me directly, you can do that also.
Blessings to one and all,
Michael
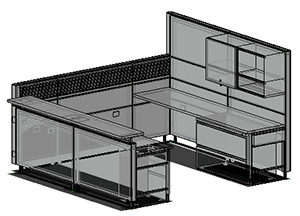
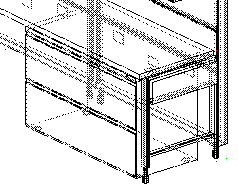
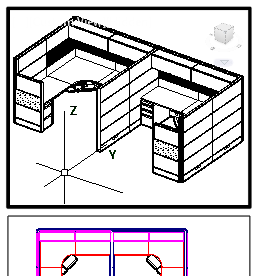
X-Ray Visual Style Update
I love Visual Styles. Over the last 14 years, you will find a handful of articles on visual styles, but my favorite is the X-Ray (last covered 7 years ago in February 2009).
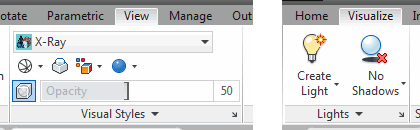
Recommended Ribbon Components
For the Visual Styles panel, go to the View tab, then right-click on the Ribbon
 Show PanelsVisual Styles.
For the Ground Shadows tool, turn on the Visualize tab. [Right-click on the Ribbon, then click Show Tabs
Visualize].
Note: Yes, I'm a big fan of the listing of Visual Style Controls in the upper left corner of the drawing window, but the Visual Styles tab has additional cool tools & features.
Visual Styles Panel
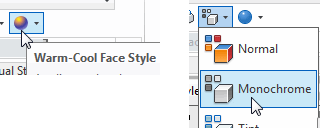
To configure the view as shown in the sample workstation, use the Monochrome Color Mode.
Adjust the Opacity slider for the desired ‘ghost’ setting.
Combine the Warm-Cool Face Style with the color mode.
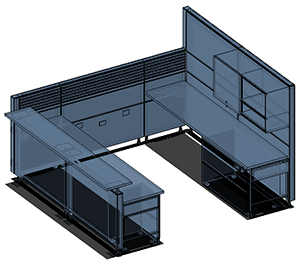
By default, the Monochrome color mode is Grayscale. Set the variable VSMONOCOLOR to any color using the syntax "RGB:R,G,B" such as "RGB: 153,190,234" to get this blue scheme. Yes, the quotes are necessary.
Note: To find an RGB number, launch the COLOR command, click on the True Color tab, then meander through the rainbow of colors and find one you like. The RGB number is displayed on the right, or in the color box below the color bar.
Ground Shadows Feature
Since this is a single command and on a totally other tab, right-click on the Ground Shadows button
Add to Quick Access Toolbar.After enabling Ground Shadows, if they don't appear, on the Visual Styles tab, adjust the opacity to 66 or higher. I know, weird.
Other Considerations
For a ‘Stippled’ effect, turn of the Hardware Acceleration for the moment, then capture the image.
For a white background — which is what I had to configure for these screen captures — go to Options
Display tabColors button.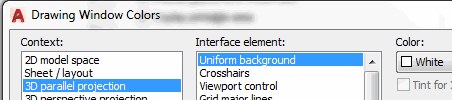
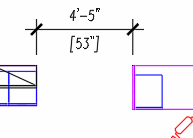
Use the Windows Snipping Tool to create an image of your view. Even if you save the capture as a raster image you can paste it back into AutoCAD as an OLE object and the image won't be ‘external’. See Michael's Corner, December 2012.
Layout Tab Ideas
Save a Named View — coverage below — then restore that view in a viewport. The named view retains the condition at the time the view is created, which means you can go back to 2D Wireframe in Model space after creating the view.
Each viewport has its own collection of view controls in the upper left corner.
Paste a captured image on the Layout tab, that way you won't need a viewport.
I hope you have as much fun with these settings as I did!
Power Tool
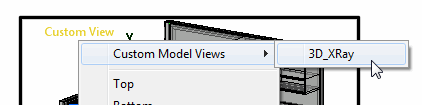
Named Views
This is a portion of the Named View topic from Chapter One of The AutoCAD Workbench — Final Edition…
When saving a view by name, AutoCAD effectively takes the X,Y of the lower left and upper right corners of the screen and puts them in a ‘shoebox’ and labels it with the view name.
Restore the view and AutoCAD opens the ‘shoebox’ and sets the coordinates up, just the way they were when you saved that view.
How to Save a View by Name
Zoom to the drawing area you would like to save by name.
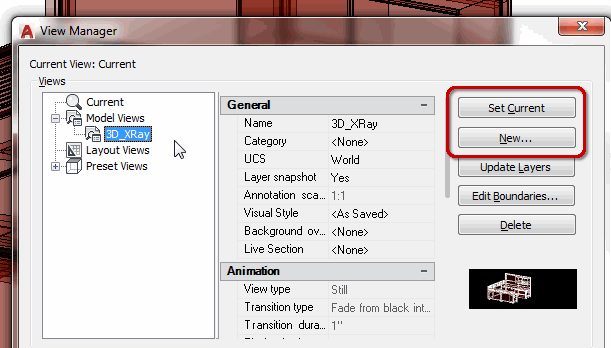
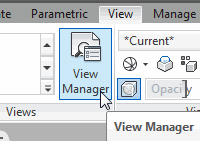
Click View Manager to open the View Manager (or type the alias, V).
Note: The View panel of the View tab needs to be enabled to access the View Manager. You can also type V to open the View Manager.
Click New, enter a View Name, then click OK.
To set a named view to current, you can simply double-click the view name, or select the named view from the list in View Manager, then click Set Current.
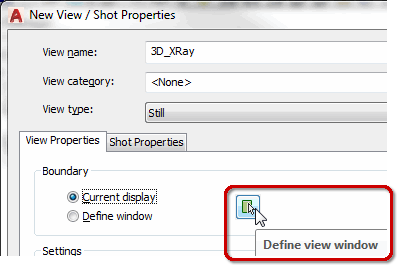
If you launched View Manager prior to zooming to the desired view, use the Define View Window button (shown here) to take you back to the drawing so you can define the view window.
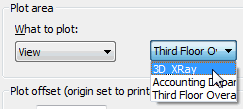 Note: Since you can have as many named views as you want, the option to plot a named view is very handy!
Power Tool
Macro to Switch from Model to Paper
TILEMODE

0

TILEMODE

1
That short review will solicit a rolling of the eyes, smiles, and/or endless memories running through the minds of readers… all of whom will be over the age of 25. Well over.
And they still work!
Set TILEMODE to <1> to flip to the Model tab.
Set TILEMODE to <0> to flip to a Layout tab (then you can use Ctrl + PgUp or PgDn to cycle through layout tabs).
You can either write a Lisp routine, put 'em on buttons on the Quick Access Toolbar, or put 'em on buttons on the Tool Palette — all of which are covered extensively over the years in Michael's Corner.
You just tried it, right!?
The Odd Spot
Forcing the Colors to B&W in a Viewport
Plotting can be a pig and misbehave at the most inconvenient times.
A popular problem is the inability to successfully get a Monochrome/Black & White plot. Although you can do this in Model space, there's a nice trick you can do with layers in a viewport called ‘Viewport Overrides’ (originally covered in July 2007).
How to Assign a Layer Color By Viewport (Viewport Override)
Activate the viewport in which you want to edit the layer colors.
Right-click in the Layer Properties Manager, then
Select All.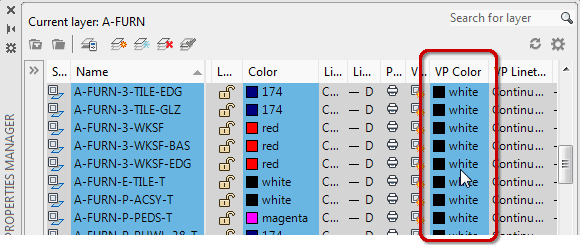
In the VP Color column, click the white/black color swatch, then click OK.
 Note: To cancel the Override color setting, return to the Layer Properties Manager, select all the layers, then right-click
 ![]() Remove Viewport Overrides for
Remove Viewport Overrides for![]() Selected Layers
Selected Layers![]() In Current Viewport Only.
In Current Viewport Only.
The Basics
Dual Dimensions in a Dimension Style
 ‘Alternate Units’ doesn't always mean Metric.
To follow along, set the current Dimension style to one you like. The following exercise begins with a Dimension Style with the Unit format set to Architectural on the Primary Units tab.
How to Display Ft′-In″ as well as Inches
Launch the Dimension Style dialog box [Alias: D], click New and enter a name, then click Continue.
Click the Alternate Units tab.
In the upper left corner, put a check in the box for Display Alternate Units.
Set the Unit Format to Fractional.
Note: I would suggest you set the values for the Precision and the Round off to the same values as those on the Primary Units tab.
Set the Multiplier for Alt Units to 1.00.
In the Suffix edit box, put the inch marks ( ″ ).
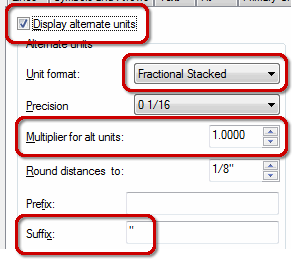
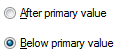
The last setting you may want to make is to set the Placement feature radio button (under the preview) to Below Primary Value.
Click OK, Close the Dimension Style dialog box, then check out your new dimension!
Left Field
Studies Show… It's Normal to Forget!: At my age, this is great news! The average adult forgets three key facts, chores or events every day, a study has found. Around 15 million people will leave a cup of tea or coffee to go cold today. Meanwhile 12 million will go to shops only to completely forget what they went there for. Top 25 Most Forgotten from The Telegraph [UK].
Donate to CADTutor
If you found this article useful, you might like to consider making a donation. All content on this site is provided free of charge and we hope to keep it that way. However, running a site like CADTutor does cost money and you can help to improve the service and to guarantee its future by donating a small amount. We guess that you probably wouldn't miss $5.00 but it would make all the difference to us.
Note from Michael: I want to thank all of my customers for continuing to retain my training services (some for over three decades!) and let you know your donations do not go to me personally, but to the ongoing maintenance of the CADTutor ship as a whole and to support the yeoman efforts of my friend and CADTutor captain, David Watson, to whom I am grateful for this monthly opportunity to share a few AutoCAD insights.
Share this page:


The Basics
- Dual Dimensions in a Dim…
- UCSICON Options
- "Best of" Basics: Irreg…
- Tool Palette Basics
- Original Dimension Value
- Possible Solutions to th…
- Avoid Using 'Standard' i…
- Shorten the Plot Scales…
- Update the Source File B…
- User Increment Angles fo…
- Drawing Information
- 'Sign Language'
- Rotate with the Copy Opt…
- Use the INSERT Osnap on…
- To or From the Current L…


