

 Michael’s Corner #34
October 2005
Fun, Final, and Fundamentals
This month I'm going to wrap up my DesignCenter segment which grew to five installments; there's a lot you can do with that critter. By rights, I should do one more to cover the Online feature of DesignCenter, but I'll save that for another time. I think the A2006 "view transition" feature is kind of fun, but I know some of you may be looking for how to shut it off. A dimensioning feature that may be applicable to a good portion of you is how to create dimensions that display only inches. When I had questions about that from two different customer training sessions within one month, I thought it was time to "go global" with it. And for those of you with lots of plotting to do on any given day, the Publish command may be worthy of consideration.
If you would like to contact me directly, you can do that also.
Blessings to one and all,
Michael
Publish

For the last several versions now, the Publish command has been largely overlooked. Sheet Sets are great, but when you have a number of layouts to plot, the Publish dialog box is the best "batch plot" utility.
If you have a drawing open when you launch the Publish command, the drawing's Model and Layout tabs are listed. In addition to managing the list of sheets, you can also opt to output the drawings to the device named in the page setup for each sheet listed, or create a multi-page DWF file. Publishing to DWF is a great feature and I will review all-things-DWF next month.

Key Features of the Publish Dialog Box
Add Sheets: The Add Sheets button opens a dialog box from which you can select a drawing. That drawing's Layout tabs (and Model tab if specified to be included) will be added to the list of Sheets To Publish.

Remove Sheets (or hit Delete): Select the sheet (or sheets with click + drag), then click the Remove Sheets button or simply hit Delete on the keyboard.
Move Sheets Up/Down (or Pick+Drag): When you click the Publish button, the sheets in the list are sent to their respective output devices in the order listed. If you need one drawing sooner than the others, select it, then you can either click the Move Sheet Up button, or simply drag the selected sheet(s) to the top.
Save Sheet List: Use it. You know that if you think you won't need this list of sheets again, you will . Either the customer will call and ask for 'another' set, or you will have another meeting a couple weeks later and you'll need the same collection. By default, it saves the DSD file with the same name and in the same folder as the drawing that is current when the Publish command is launched.
Note: A saved sheet list (DSD) essentially points to the Model and Layout tabs of the listed sheets; it's just a "gopher" (an American slang word for someone who "goes for" whatever is needed; coffee, staples, lunch,… or sheets). After a sheet set is loaded, when you click the Publish button, the current status of the drawing is plotted/printed.

Load Sheet List: Loads the specified .DSD listing of sheets. If a drawing is open, you may get the Replace or Append alert box shown above.
 Shortcut Menu: A shortcut menu is also available for all button features and includes the ability to change the page setup or rename the selected sheet(s).
Number of Copies: If plotting to the device named in the page setup for each sheet, you have the option of specifying the number of copies of each sheet. Please note these are not collated.
Publish Options: If plotting to DWF, use the Publish Options dialog box to configure both general and specific DWF-related features. I'll cover this more fully in November.
Gold Star Tip: For drawings with multiple layouts, click one layout tab, then hold down CTRL and select the other layouts to publish. Now right-click and in the shortcut menu, click Publish Selected Layouts. The Publish dialog box will open with only the selected layouts in the list!

Power Tool
VTOPTIONS
 Those of you with AutoCAD 2006 have noticed the "elegant" way in which AutoCAD glides the view to display your drawing if you do Zoom
![]() Extents, use a Zoom window, or any number of other methods by which you change your view.
Extents, use a Zoom window, or any number of other methods by which you change your view.
There's also a good chance some of you would like to eliminate that "feature"… (or maybe adjust those settings on the system of one of your favorite co-workers).
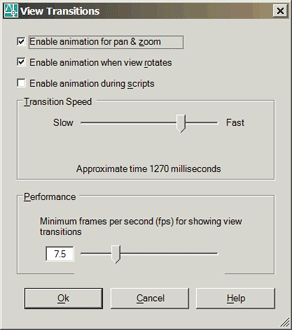
The View Transitions dialog box is the place where you can make the desired changes. If there are times when you would appreciate the transition effects, but other times you wouldn't, consider making a button (with a macro), a script, or a Lisp routine to change the settings.
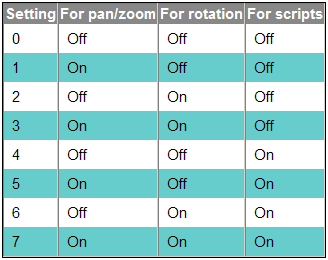
The variable VTENBLE has a valid range of 0 to 7 per the chart shown below.
The Odd Spot
Inches Only Dimensions
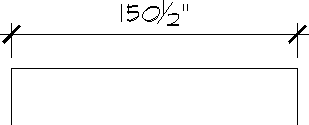
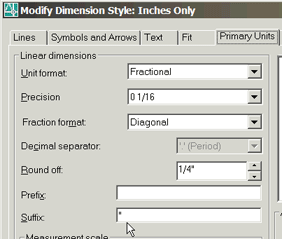 For those of you who only want to see inches in your dimensioning, I would recommend that you create a new dimension style in your master drawing or template.
Settings for a Dimension Style to Display Inches
- In the Primary Units tab of the Dimension Style Manager, set the Unit Format to Fractional.
- To see the inch mark after the dimension value, put the " mark in the Suffix text edit field.
The Basics
DesignCenter - Final Installment (…for now)
 Turbo-time. My friend Tracy Lincoln (see his great AutoCAD blog at http://tlconsulting.blogspot.com ), sent me a note about a couple things I had yet to mention about DesignCenter, so I thought I'd pass them along in this final installment covering DesignCenter.
The Search feature in DesignCenter is amazing!
Instructions to Search for a Layout Containing the Word "Floor"
- Open DesignCenter (Ctrl + 2) and click on the Search button to open the Search dialog box.

- In the Look For drop-down list, click Layouts.
- Click the Browse button, then navigate to C:\Program Files\AutoCAD?? (whatever version you have).
- In the Search For The Name field, enter *floor* , then click Search Now.
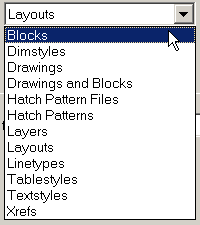
- After the search is complete, double-click on the layout you to want access. DesignCenter will then navigate to the drawing containing that layout.
In addition to Layouts, you can search for named objects such as layers and text styles, drawings containing specified characters, that elusive hatch pattern (.PAT) or an Xref that you have… somewhere.
Gold Star Tip: To find all the Xref files that are in one of your project folders, put an asterisk (*) in the "Search For The Name" field.
Here's another one that Tracy Lincoln suggested: What if you have more than one folder in which you have drawings and other content you need to access? You could use the Home feature (covered in the September DesignCenter article), but you may have more than one "special" location.
The command ADCNAVIGATE enables you to enter the path of the folder or drawing (be sure to add the .DWG if navigating to a specific drawing) to automate the navigation of DesignCenter. The cool thing is, AutoCAD puts things on hold so you can type the whole path with the backslash to change folders… and it will accept a space if the folder or drawing has a space in the name.
If you're writing a Lisp for this routine, remember to change folders using a forward slash:
(DEFUN C:NN()(COMMAND "ADCNAVIGATE" "C:/ATG/CUSTOMER DRAWINGS")(PRINC))
Note: Curiously, when creating a tool palette button to launch ADCNAVIGATE with a path containing spaces, the typical method of placing the full path in quotes is not successful. Other routines which access folder names containing spaces, such as -INSERT function properly. Those of you who have found a workaround for this anomaly, please let me know.
Left Field
Advanced ornithology The tongue of the woodpecker begins at the right nostril, splits, wraps around the skull beneath the skin, rejoins, then comes up through the lower jaw… and can be barbed or brushlike.
Donate to CADTutor
If you found this article useful, you might like to consider making a donation. All content on this site is provided free of charge and we hope to keep it that way. However, running a site like CADTutor does cost money and you can help to improve the service and to guarantee its future by donating a small amount. We guess that you probably wouldn't miss $5.00 but it would make all the difference to us.
Note from Michael: I want to thank all of my customers for continuing to retain my training services (some for over three decades!) and let you know your donations do not go to me personally, but to the ongoing maintenance of the CADTutor ship as a whole and to support the yeoman efforts of my friend and CADTutor captain, David Watson, to whom I am grateful for this monthly opportunity to share a few AutoCAD insights.
Share this page:


The Basics
- Dual Dimensions in a Dim…
- UCSICON Options
- "Best of" Basics: Irreg…
- Tool Palette Basics
- Original Dimension Value
- Possible Solutions to th…
- Avoid Using 'Standard' i…
- Shorten the Plot Scales…
- Update the Source File B…
- User Increment Angles fo…
- Drawing Information
- 'Sign Language'
- Rotate with the Copy Opt…
- Use the INSERT Osnap on…
- To or From the Current L…


