

 Michael’s Corner #75
March 2009
Marching into Spring

I know, that title is lame, but it is nice to see Spring on the horizon, nonetheless. A piece of my winter was spent south of the equator, as many of you know. So while my lovely bride of 23 years was taking care of our home in freezing temperatures, I was on a new adventure in Angola.
Several of this month's articles came up while I was there at Chevron's Malongo camp. It has been several years since I reviewed data extraction, so I have a simple overview of the screens you'll see for that process. I'm finally going to address the Double-Click action settings in the CUI this month, too… and this month will be our inaugural foray into the use of animation for an article!
I made an interesting discovery with one of the Chevron drawings involving a 2D Polyline, too, so that's in the Odd Spot. And one of the folks in my training was interested in the ability of splitting the Model view into viewports - a powerful feature that's been around for a really long time that warrants a Basic review.
All in all, it was a fabulous 2 week at Chevron's corner of Cabinda, and I'm looking forward to the possibility of a return trip to work with the many friends I made while I was there.
If you would like to contact me directly, you can do that also.
Blessings to one and all,
Michael
Extracting Attribute Data
Many of the drawing title blocks for the Cabinda Gulf Oil Company drawings are rich with attributes, including revision information, project titles and information, and approvals. One of their Document Control folks was interested in knowing if there was a way to extract that data and put it in an Excel sheet.
In July, 2003 I covered how to extract data from a drawing, but it's time for an update. These procedures work for A2008 & A2009; I haven't checked A2007.
Instructions to Extract Data From an Attributed Title Block
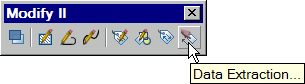
- On the Modify II toolbar, click Data Extraction to open the first page of the Data Extraction dialog box (or "Extract Data" from the "Blocks & References" tab of the Ribbon).
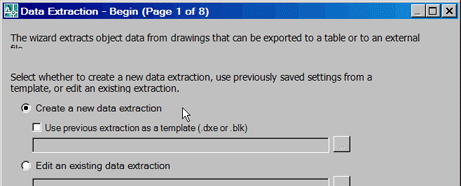
- For new extraction files [.DXE], click the radio button for "Create A New Data Extraction", then click Next to open the Save Data Extraction As dialog box. Enter a name for the DXE, then click Save.
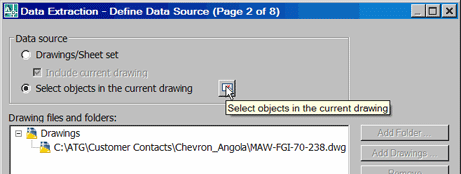
- For this application - where I'm only selecting the attributed title block - click the "Select Objects In The Current Drawing" radio button, then click the Select Objects button. After selecting the objects, click Next.
- In the Data Extraction dialog box, under Display Options, clear the check box for "Display All Object Types", then click the radio button for "Display Blocks Only". You can leave the other two boxes checked for displaying of blocks and objects. Click Next.
Note: If you use the Data source option of "Drawing/Sheet Set", you can Add Drawings to the extraction process.

- In the Select Properties page (Page 4), under Category Filter, clear all the check boxes except for Attribute and Drawing. The resulting list will display all attribute and drawing-related information. Scroll through the properties and toggle off those you won't need in the final result. Click Next.

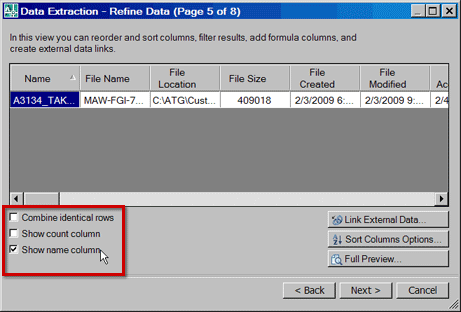
- In the Refine Data dialog box, in the lower left corner, check or clear the desired check boxes, then click Next.
- Choose the desired option - Insert a table into the drawing or save an external file - then click Next.
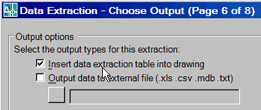
Note: If you opt to insert the data as a table into the drawing, your next screen will give you an opportunity to choose the desired Table style and/or formatting structure. See August 2008 for coverage of the current status of Tables.
- At this point, you have completed all the requisite steps to extract data from your drawing and can click the Finish button on the final screen.

Closing notes
Obviously, there is much more that can be done with this extraction tool and this has been just a quick review of the steps involved in accomplishing the extraction of data from a single attributed block in a drawing.
Also, if you find that the result is agreeable and you would like to repeat the process for another drawing or group of drawings, when you launch the Data Extraction dialog box, you will notice there's an option to "Use Previous Extraction As A Template".
Power Tool
Double-Click to Edit Dimension Text
One of our readers contacted me recently regarding editing dimension text and commented that once upon a time you could double-click the dimension to edit the text. Nowadays, you double-click a dimension and get the Properties window for that dimension.
I figured this would be a perfect application for creating your own double-click action.
Keeping in mind that AutoCAD 2010 is on the horizon, you will want to set this action under CUSTOM in the CUI so it will translate over when you upgrade to the next version.
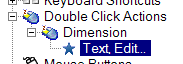
Instructions to Modify the Double-Click Action for Dimensions
- Open the CUI, then go to the bottom of the tree view and expand the Partial CUI Files, then the CUSTOM node.
- Right click the Double Click Action node, then click New Double Click Action.
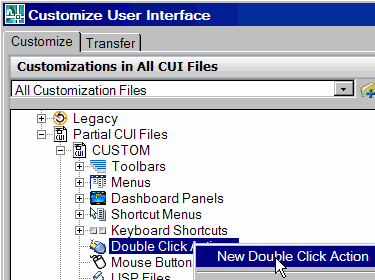
- You now have an opportunity to name your action; I named this one "DimEdit".
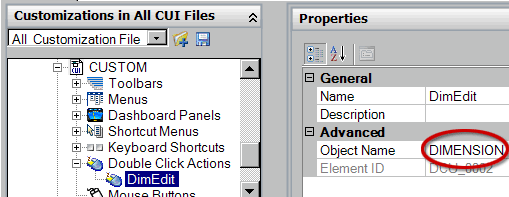
- On the right hand side, under Properties, set the Object Name to DIMENSION.
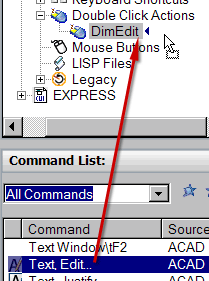
- Under Command List, drag Text, Edit onto DimEdit action.
Bom! (That's a little Portuguese I learned from my friends in Cabinda)
Free Video Offer!
If you prefer your tutorials in video format, take a look at the Double-Click Action for Dimensions video tutorial (opens in new window). This is an experiment and we'd be interested to know what you think, so let us know.
The Odd Spot
2DPolylines vs. Polylines
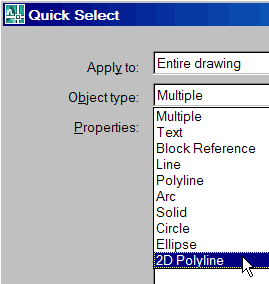
The Chevron Facilities Engineering Department at the Malongo camp in Angola receives hundreds of drawings from outside contractors. One of the drawings was nearly 90Mb but contained very little geometry; truly perplexing.
Using the Quick Select window (QSELECT command), I noticed in the list an Object type called "2D Polyline".
Note: Many versions ago, Autodesk optimized polylines in drawings, so now when you List a polyline, you see it's referred to as an LWPOLYLINE (Light-Weight Polyline). By default, when an older drawing is opened, the old polylines are automatically converted into the new LWPOLYLINE.
Curiously, AutoCAD's Help feature adds this tidbit regarding old polylines… "Polylines containing curve-fit or splined segments always retain the old format."
Dilemma: I have several polylines that were obviously created with a curve-fit or splined segments.
Solution: The EXPLODE command; seriously. If you Explode one of these fat polylines - depending upon their original creation method - they may revert to lines or arcs (which you could then Pedit back to normal polylines). In the figure below, the curved shape on the left is an old polylines. When exploded, it becomes a series of arcs… and the file size becomes smaller.

Obviously, this is not a desirable solution for every circumstance, but simply something you may want to consider.
Credit: As I was completing this article, David Watson (the intrepid captain of the CADTutor ship), passed along the optional use of the Convert or Convertpoly commands. Both of these commands should be considered as you seek to optimize your drawings… and I was not familiar with either one of them! Thank you, David!
The Basics
Split Viewports in Model Space
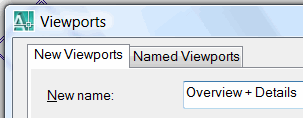
Whether you're working on large drawings, or simply have a need to be zoomed in to more than one area in the drawing at a time, one approach is to split the Model space window using the VPORTS command. [View ![]() Viewports
Viewports![]() New Viewports]
New Viewports]
When I was training the CABGOC team in Angola, Maria, Mateus, and Pedro found this feature particularly useful for working on their 3D piping drawings.
Instructions to Use Multiple Viewports in Model Space
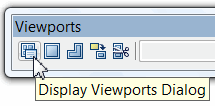
- While in Model space, on the Viewports toolbar, click Display Viewports Dialog ("Named" on the View tab of the Ribbon) to open the Viewports dialog box with the New Viewports tab current.
- the listing for Standard Viewports, you will see several arrangement options.

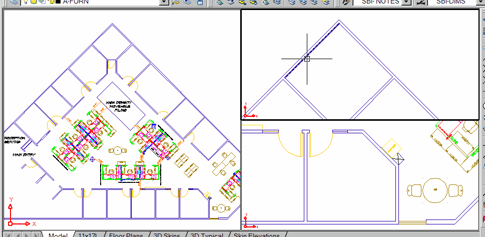
Note: The arrangement named "Three: Left", means Model space will be split into three viewports, with the big viewport on the left. The illustration with the floorplan shows that arrangement.
- After choosing viewport arrangement, click OK and your Model space screen will split per your selection.
- Activate one of the viewports, then zoom or pan to the desired location. Each viewport can have a separate display of the same drawing.
Note: You can launch an edit command such as Move, in one viewport and select the objects and specify a basepoint, then click in another viewport to place the objects (you may want to turn off Ortho).
- Open the Viewports dialog box, then click in the "New Name" field and enter a name for this arrangement as shown in the illustration, then click OK.
- the list of Standard viewports, click "Single" then click OK to return to the normal Model space configuration.
- To restore the named viewport, open the Viewports dialog box, then click the Named Viewports tab to display a list of named viewports in this drawing.
- Select your named viewport, then click OK to display the saved viewport arrangement.
Left Field
 Fruit Bats - The fruit bat is the largest of bats, and one of the most important to humans. Many of the fruits and vegetables we enjoy on our table would not exist without these bats. They disperse the seeds and pollinate the flowers of many plants. My visit to the Cabinda Gulf Oil Company base in Malongo was punctuated by the presence thousands of fruit bats in the morning and evening.
Donate to CADTutor
If you found this article useful, you might like to consider making a donation. All content on this site is provided free of charge and we hope to keep it that way. However, running a site like CADTutor does cost money and you can help to improve the service and to guarantee its future by donating a small amount. We guess that you probably wouldn't miss $5.00 but it would make all the difference to us.
Note from Michael: I want to thank all of my customers for continuing to retain my training services (some for over three decades!) and let you know your donations do not go to me personally, but to the ongoing maintenance of the CADTutor ship as a whole and to support the yeoman efforts of my friend and CADTutor captain, David Watson, to whom I am grateful for this monthly opportunity to share a few AutoCAD insights.
Share this page:


The Basics
- Dual Dimensions in a Dim…
- UCSICON Options
- "Best of" Basics: Irreg…
- Tool Palette Basics
- Original Dimension Value
- Possible Solutions to th…
- Avoid Using 'Standard' i…
- Shorten the Plot Scales…
- Update the Source File B…
- User Increment Angles fo…
- Drawing Information
- 'Sign Language'
- Rotate with the Copy Opt…
- Use the INSERT Osnap on…
- To or From the Current L…


