

 Michael’s Corner #139
April/May 2015
Ch-ch-ch-Changes
It's that time of year again and you have all probably found numerous reviews of AutoCAD 2016 scattered around the internet. This month's offering does have one A2016-specific bit of insight for you that I think you'll find very relevant, (even if you aren't moving all the way up to A2016), in addition to a few ‘under-the-hood’ features that came up in training recently.
So this time we're considering…
…How to transfer your Quick Access Toolbar content from your current AutoCAD version to another version
…The technique to toggle to other multifunction grip options
…Where to find the tool that allows you to divide a split viewport in Model space
…What to do if the block changes in your block source drawing (for your tool palette)
AutoCAD 2016's looking pretty good to me and I'm really excited about writing more about it in the months ahead!
…and I am SO glad Spring is here!
Carry on, friends!
If you would like to contact me directly, you can do that also.
Blessings to one and all,
Michael
Transferring Your Quick Access Toolbar to AutoCAD 2016
At the conclusion of my AutoCAD training sessions, my customers have a really cool Quick Access Toolbar… and that's what they frequently want to port over to the next version.
 So, if you would rather keep the AutoCAD 2016 tabs and panels in their original condition until such time as you can edit them, here's how to grab the customized Quick Access Toolbar of your current version… and introduce it to ‘the new kid on the block’.
How To Transfer Your QAT
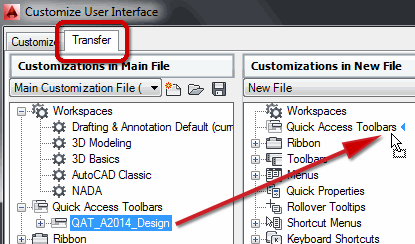
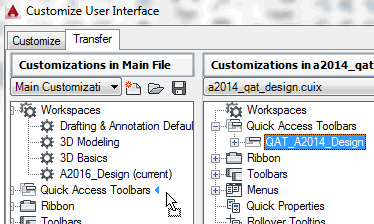
Open the CUI, the click on the Transfer tab to display the ‘Customizations in New File’ side of the CUI.
Back under the ‘Customizations in Main File’ side, expand the Quick Access Toolbar node, then expand Quick Access Toolbar 1 to display your custom collection.
Note: You may want to consider Renaming your QAT to avoid confusion in the target version.
Now click and drag your Quick Access Toolbar over and release it next to Quick Access Toolbars under ‘Customizations in New Files’.
 Click Save, then navigate to a place you want to save the .CUIX file. I would recommend including ‘QAT’ in the filename so it won't be confused with other .CUIX files you may create.
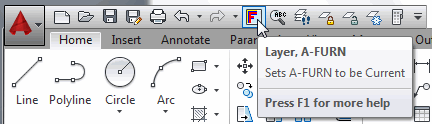
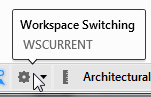 Note: Before transferring your Quick Access Toolbar to your newest version of AutoCAD, I would recommend that you first create a new Workspace by going down to the Workspace Switching icon, then click Save Current As.
After creating a new workspace in your newest version of AutoCAD, open the CUI.
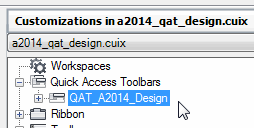
 Click the Transfer tab, then on the ‘New Customizations in New Files’ side on the right, click Open.
Select the .CUIX you saved in Step 4, and click Open.
Expand the Quick Access Toolbars node to see your imported content, then click and drag it over to the left on the ‘Customizations in Main File’ side and release it next to the Quick Access Toolbars node.
…Almost finished!…
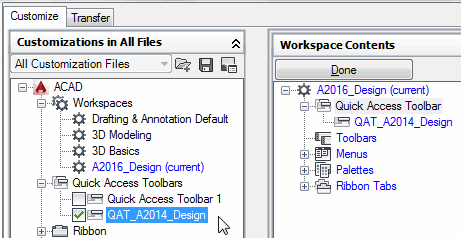
Click the Customize tab, then click the name of your new Workspace to display the ‘Workspace Contents’ pane on the right.
Click Customize Workspace to display the Quick Access Toolbar check boxes on the left.
Now click Done, then click OK to close and save your CUI edits… and check out your transferred Quick Access Toolbar!
Power Tool
Multifunction Grip
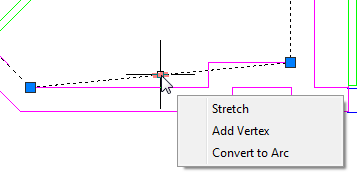 Most blue grips come with a shortcut menu when you hover in them, then you click what you want to do.
Short version: After committing to one of the options, click CTRL to cycle between the other options.
[Thanks to my good friend Ronny at Alabama Power for that one!]
The Odd Spot
Split the Split Viewports
Six years ago, in March 2009, then again in October 2013, I addressed the usefulness of split views in Model space. I recently learned of a feature introduced in AutoCAD 2015 that enables you to split one of the viewports into either a horizontal or vertical segment.
How to Subdivide a Split Viewport
On the View tab
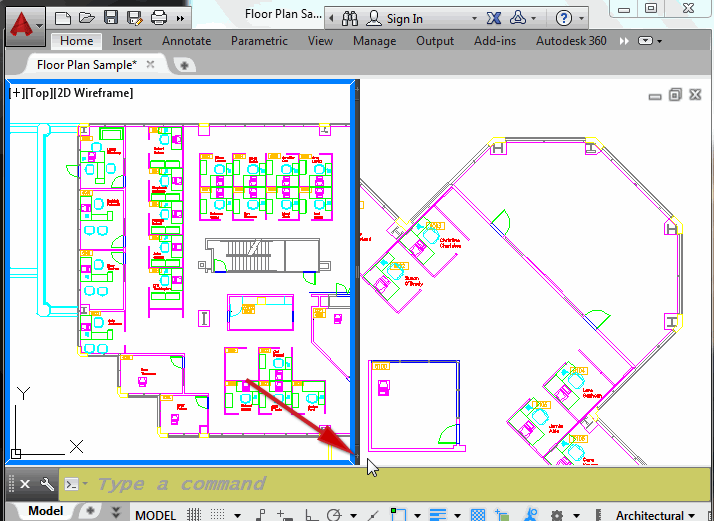
 Model Viewports panel, click the View Configuration dropdown arrow, then select Two: Vertical.
  At the bottom of the division line, there is a tiny, tiny plus sign (+), shown here in the enlarged image.
Pick it, then drag it into either viewport, and you will notice a green division line that positions the split.
Note: To switch between a horizontal or a vertical split, click the plus sign, then drag around a viewport just inside the perimeter and the green division line will switch automatically.
To join two viewports—an option not available in the Viewports dialog box—you will need to use the command line version shown below: -VPORTS
Command: -VPORTS
Enter an option [Save/Restore/Delete/Join/SIngle/?/2/3/4/Toggle/MOde] <3>: J
Select dominant viewport <current viewport>:  Press [ENTER]
Select viewport to join: Click in an adjoining viewport
The Basics
Update the Source File Block Edits on the Tool Palette
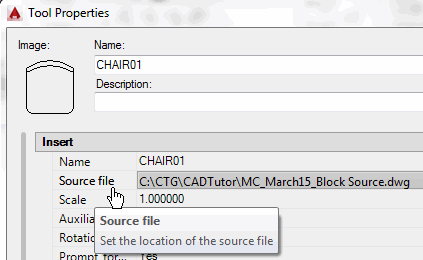 Throughout the archives of Michael's Corner you will find dozens of references to tool palettes, including the key component of blocks on a tool palette: the Source File. [Coverage of the Block Source file was originally presented in March 2006.]
Scenario: You add this armless chair to the source file and put several chairs in a drawing… then you update the chair in the source file with arms.
Problem: The chair on the palette now displays arms, but the chairs in the drawing have no arms, soooo…
How to Update Drawing Blocks from the Source File
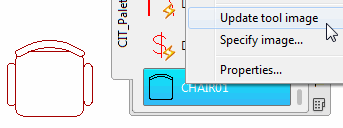 After modifying the block in the Source File, right-click on the related block on the tool palette, then click Update tool image.
Now, in the drawing containing the blocks that were in the former armless state, go to the tool palette, right-click on the updated block image, then click Redefine… and all those chairs now have the updated condition with arms!
Left Field
Ice Harvesting : Totally true. A 22-year old Boston entrepreneur, Frederic Tudor, "dreamt up the scheme to harvest wintertime ice from New England's ponds and rivers and export it to the tropical French colony of Martinique where it could be used to cool drinks, preserve food and soothe patients suffering from yellow fever." Totally fascinating.
From History Channel's History in the Headlines, The Man Who Shipped New England Ice Around the World.
Donate to CADTutor
If you found this article useful, you might like to consider making a donation. All content on this site is provided free of charge and we hope to keep it that way. However, running a site like CADTutor does cost money and you can help to improve the service and to guarantee its future by donating a small amount. We guess that you probably wouldn't miss $5.00 but it would make all the difference to us.
Note from Michael: I want to thank all of my customers for continuing to retain my training services (some for over three decades!) and let you know your donations do not go to me personally, but to the ongoing maintenance of the CADTutor ship as a whole and to support the yeoman efforts of my friend and CADTutor captain, David Watson, to whom I am grateful for this monthly opportunity to share a few AutoCAD insights.
Share this page:


The Basics
- Dual Dimensions in a Dim…
- UCSICON Options
- "Best of" Basics: Irreg…
- Tool Palette Basics
- Original Dimension Value
- Possible Solutions to th…
- Avoid Using 'Standard' i…
- Shorten the Plot Scales…
- Update the Source File B…
- User Increment Angles fo…
- Drawing Information
- 'Sign Language'
- Rotate with the Copy Opt…
- Use the INSERT Osnap on…
- To or From the Current L…


