

 Michael’s Corner #109
January 2012
Oh-One/One-Two
I'm sure there's a math major out there that could make something clever out of that sequence – like the next pair would be Two-Three – and some probably want to state it as 'Zero-One'. Bottom line, the point of the exercise was accomplished: Get you thinking about your new year, 2012!
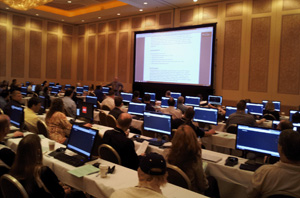 To that end, this month has some tips I picked up at Autodesk University – although I did teach my Hands-On lab twice (shown here, photo courtesy of H. Hernandez, Southwest Airlines), I did attend several sessions – as well as a few from my customers, to wit…
…Fun with AutoCAD 2012 Applications from Autodesk Exchange
…Make a Dynamic Block by Adding a Rotation Parameter
…The somewhat inconspicuous View controls in A2012
…Random productivity features from my customers
Of course, I hope this finds you back on track, several days into the New Year, and looking forward to all that it has in store.
Forward and onward into the 10th year of Michael's Corner!
If you would like to contact me directly, you can do that also.
Blessings to one and all,
Michael
Autodesk Exchange Apps for AutoCAD
 One of the more fun seminars at Autodesk University last year presented some Apps that are available through Autodesk Exchange, a little-known community that can be launched within AutoCAD 2012.
There are dozens of applications available through Exchange, some of which have a fee, but there are several that are Free. You will need to have an AutoCAD Exchange account (typically the account used when installing AutoCAD).

Note: After installing a downloaded app, your workspace will need to be refreshed. That said, it would be a really good idea to save your workspace prior to the following procedure.
How to Find the Clipboard Manager App from Autodesk Exchange
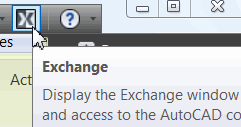
 From within AutoCAD 2012, click the "X" (Exchange link) on the title bar.
When Autodesk Exchange opens, click the Apps link.
Use Search and enter "Clipboard".
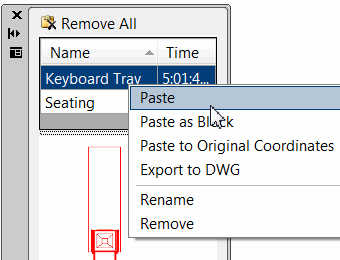
Clipboard Manager description:
The Clipboard Manager plug-in can be used with AutoCAD to manage multiple clipboard entries, storing and renaming them for later use. It's great for moving different sets of content between various open drawings or for creating repeated copies of geometry without using blocks. This plug-in was first published as an ADN Plug-in of the Month: http://labs.autodesk.com/utilities/ADN_plugins.Click the link to go to the Download site. You also have a link to the Help information, too.
 After signing in to your Autodesk Exchange account, you will then get the Terms of Use/End User License Agreement screen. Check the boxes to "Agree", then click Install | Free.
After the download, you will probably need to refresh your workspace.
Now click on the Plug-ins tab of the Ribbon to display your recent acquisition!
Note: Curiously, the Apps link is only available if you launch Exchange from the icon on the title bar of AutoCAD 2012.
Some of the other apps that I made a note about during that seminar include: Zoom All Layouts, Offset In Xref, Order By Layer (for arranging your display), Block Masker (creates a Wipeout object the shape of the block), Quick Note, and Minesweeper (seriously).
Power Tool
Adding a Rotation Parameter to a Block
This just seemed like it would be fun to add to your bucket of tricks. The end result will be a dynamic block with a rotation grip that will let you rotate the block without using the Rotate command. Check it out.
How to Add a Rotation Parameter to a Block
Open a drawing with a block or just insert one.
Single click on the block, then right-click and click Block Editor. In this exercise I'm using a chair.
 To identify where the insertion point is for the block, set the UCS Icon to the Origin. [View tab
 Coordinates panelShow UCS Icon at Origin]
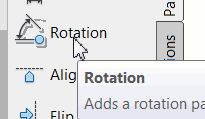
On the Parameters tab, click Rotation.
When prompted to "Specify the Base Point", specify a point that is the most logical base point for the rotation of the block, or enter 0,0 to specify the insertion point of the block.
When prompted to "Specify Radius of Parameter", turn on Ortho, then specify the point for the blue dot that will be the grip for the dynamic block rotation. I'm placing mine just off the front of the chair.
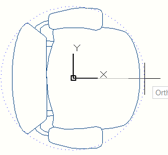
Press [Enter] to accept the default Rotation Angle of <0>. You will now see the rotation grip and a yellow box at the Base Point.
 On the Actions tab, click Rotate.
When prompted to "Select Parameter", click anywhere on the dotted circle or the "Angle1" text, but do not press [Enter].
When prompted to select the objects for the action, window the entire block, then press [Enter]. You will now have a small Rotate parameter icon displayed near the grip point of your chair.
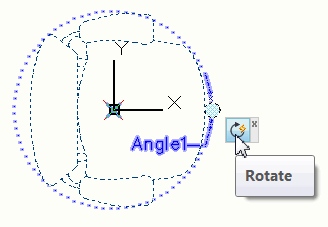
Click Close Block Editor and save your changes.
Now when you click on that block, you can take the blue rotation grip… and swing that thing around!
Bonus Points: Add this block to the Source drawing containing blocks you have placed on your Tool Palette, then add this block to the Tool Palette.
The Odd Spot
A2012 View Controls
 For those of you working in 3D drawings with any regularity, AutoCAD 2012 introduced a very clean collection of three view controls tucked away in the upper left corner of the Model view.
Note: If you have changed your screen colors [Options![]() Display tab
Display tab![]() Colors], there's a possibility you may not see the three controls in an active viewport. If, however, you hover in the upper left corner of the viewport, the tool tips for the respective features will appear.
Colors], there's a possibility you may not see the three controls in an active viewport. If, however, you hover in the upper left corner of the viewport, the tool tips for the respective features will appear.
 Viewport Controls [see figure] — The most interesting feature of the first item in that collection, is the Viewport Configuration List which enables you to split your Model display into multiple viewports. See Michael's Corner Basics from March 2009.
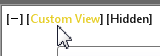
View Controls — This item provides access to the common view positions of SW Isometric, SE Isometric, etc., similar to the positions available from the View Cube. You can also open the View Manager dialog box from this item, too. If your current display is something other than one of the defaults, that slot will read "Custom View", as seen in the figure.
Visual Style Controls — The last of the three items provides access to the standard list of visual styles; Realistic, Hidden, etc. Similar to View Controls, the Visual Styles Manager is at the bottom of the list when you click this item.
All three of these features are particularly handy if you find yourself on another tab of the Ribbon and need to change your view settings.
The Basics
This Year, Resolve to Use…
My visits to Guam are always rewarding because I meet such nice folks. Last month I had the privilege to train four more people from the government NAVFAC group.
During our training, a couple of the following questions came up, so I thought I'd pass these along, as well as a few others that have been stacking up in my "Basics" list.
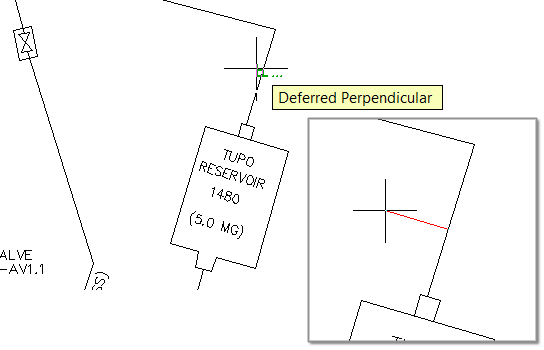
Snap Perpendicular From an Object
Many of us are familiar with snapping Perpendicular To an object, but if you launch the Line or Polyline command, then invoke Snap to Perpendicular (use Shift + Right click if needed), you can then slide along your geometry (including circles) then specify a point to begin the line. It essentially acts as Ortho for drawing new geometry from non-orthogonal lines.
Select Similar: The Settings Option
 Introduced in AutoCAD 2010, the Select Similar feature is amazing. (See the Basics in Michael's Corner, May 2011 when guest author and CADTutor captain, David Watson, provided a nifty video tutorial on this very topic). But what object properties determine if something is ‘similar’.
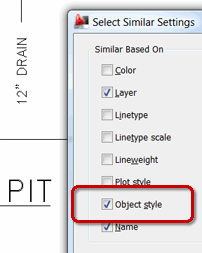
Curiously, you will need to launch the SELECTSIMILAR command to get the option for SEttings… since it's not available from the right-click menu which is the most common method of invoking this feature.
By default, Layer and Name (object name/type) are on. But if you want to select the text that is on the same layer and also uses the same Text Style?
Solution: Check the box for Object Style!
OFFSET: The Layer and Erase Options
Have you ever taken the time to consider the options available for the Offset command?
Command:  OFFSET

Current settings: Erase source=No  Layer=Source  OFFSETGAPTYPE=0
Specify offset distance or [Through/Erase/Layer] <1.0000>:
The Offsetgaptype option was covered way back in the June 2003 Basics of Michael's Corner, but back then the Erase and Layer options were not available, so here's how they work:
Erase: [Yes / No] Default: No
Set to Yes, after completing the offset, the source object will be erased.
Layer: [Source / Current] Default: Source
By default, the offset geometry is placed on the same layer as the source object. Set the Layer option to Current to place the offset geometry onto the current layer.
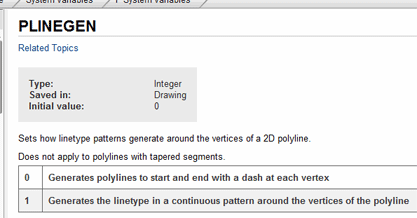
Help for Variable Values
When you're looking for the values that can be used to set a variable – for example, PLINEGEN – hit F1 for the Help window (ironically launched in Autodesk Exchange).
Alternatively, you could go to Express![]() Tools panel
Tools panel![]() System Variable Editor to open the dialog box which contains the same information. See Michael's Corner, June 2004.
System Variable Editor to open the dialog box which contains the same information. See Michael's Corner, June 2004.
Add Layers to the Quick Access Toolbar
As you navigate the Ribbon, what if you are on a tab other than Home… and you need to change your layer? Now you have to go back to the Home tab![]() Layers panel so you can change the current layer from the dropdown list.
Layers panel so you can change the current layer from the dropdown list.

Solution: Right-click in the Layer dropdown list, then click Add to Quick Access Toolbar!
Left Field
12/Dozen/Douzaine…
The English word dozen comes from the old form of the French word douzaine, meaning "a group of twelve": Assemblage de choses de même nature au nombre de douze – (translation: A group of twelve things of the same nature as defined in the eighth edition of the Dictionnaire de l'Académie française).
OK/Okeydoke/D'accord
Donate to CADTutor
If you found this article useful, you might like to consider making a donation. All content on this site is provided free of charge and we hope to keep it that way. However, running a site like CADTutor does cost money and you can help to improve the service and to guarantee its future by donating a small amount. We guess that you probably wouldn't miss $5.00 but it would make all the difference to us.
Note from Michael: I want to thank all of my customers for continuing to retain my training services (some for over three decades!) and let you know your donations do not go to me personally, but to the ongoing maintenance of the CADTutor ship as a whole and to support the yeoman efforts of my friend and CADTutor captain, David Watson, to whom I am grateful for this monthly opportunity to share a few AutoCAD insights.
Share this page:


The Basics
- Dual Dimensions in a Dim…
- UCSICON Options
- "Best of" Basics: Irreg…
- Tool Palette Basics
- Original Dimension Value
- Possible Solutions to th…
- Avoid Using 'Standard' i…
- Shorten the Plot Scales…
- Update the Source File B…
- User Increment Angles fo…
- Drawing Information
- 'Sign Language'
- Rotate with the Copy Opt…
- Use the INSERT Osnap on…
- To or From the Current L…


