

 Michael’s Corner #76
April 2009
Just Like Clockwork

Actually, it's a much better arrangement than we had back in the day. After Release 10 we figured, what, about 12-18 months before the next release? For the last several years now, you have been able to bank on the next release coming out before the end of March and as of this writing, your AutoCAD 2010 is officially on the streets.
I used A2010 for all the exercises and screen captures, just to make sure all the routines worked. They do. There have been some incredible improvements in the area of 3D in A2010, but this month I'm going to show you the good ole 3DCLIP command that many of my contract furniture customers will appreciate (which also includes a video to assist in your understanding). The custom button this month comes from a suggestion from my Angola students who always draw circles based upon the diameter, so you may want to take a look at that if you're in that situation most of the time.
Then I had an epiphany and remembered the A2000i command, BROWSER, which lets me access a URL right out of AutoCAD! And while you're accessing the Internet, take a look at our CADTutor Forum or the Help command in A2009 and A2010 that includes direct access to the Autodesk Discussion Groups.
By the way, I sent in my proposal for a 90-minute lab at Autodesk University in December, so let's hope they accept my idea… then all of you sign up and we'll have a good ole time!
If you would like to contact me directly, you can do that also.
Blessings to one and all,
Michael
3D CLIP and a Named View

There are lots of cool 3D features in AutoCAD and even more so in the newly released AutoCAD 2010, but I promised I would have an overview of the (buried) 3D Clip command, so that's what you will find here. I have also included in this exercise the process of saving a named view.
Please note that the 3DCLIP command can only be accessed from the command line.
Instructions to Clip a 3D Elevation and Create a Named View
- On the Model tab, set the view to Right [View
 3D ViewsRight].
 - Type 3DCLIP, then press <Enter> and the Adjust Clipping Planes window opens.
- Click the button on the toolbar for Front Clipping On/Off to turn that clipping plane On. The black line is used to position the Front clipping plane and the upper (magenta) line is used to position the Back clipping plane.
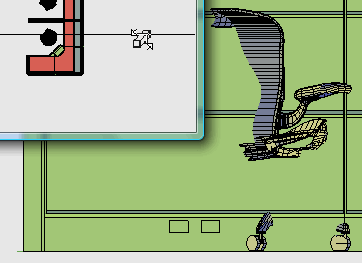
- Using the unique cursor, click and drag the Front Clipping Plane line as desired. The clipping of the 3D furniture is dynamic; you will see the objects physically clipped as you move the clipping plane. This is most obvious when you clip a 3D chair (see figure).
- Once you have the elevation the way you want it, Close the Adjust Clipping Planes window. Press Esc to exit 3DClip.
- To save this view with a name, click ViewNamed Views to open the View Manager dialog box.
- Click the New button and enter a name for the view - Interior Elevation - then click OK.
- To test that view, go to a layout tab and activate the viewport where you want the elevation view.
- Open the View Manager [ViewNamed Views], then select the elevation name from the list on the left, then click Set Current.
- Click OK to close the dialog box and your view will be displayed in the viewport.
Note: Since the clipping planes are "perpetual" in the drawing while they are On (regardless of your view), you will need to run the 3DCLIP command again to turn Off the Front Clipping Plane.
Power Tool
Custom Button #12: Circle Command with Diameter
My students in Angola primarily created engineering drawings, and one of the buttons we added to their tool palette was a button that launched the Circle command and invoked the Diameter option automatically. Here's how that works…
Instructions to Add a Command to a Tool Palette
- Open the Tool Palettes window, then go to the Draw palette (tab).
- Right-click on Circle, then click Copy.
- Go to your customized palette, then click Paste. If you don't have a tool palette of your own, take a look at Michael's Corner, March 2004.
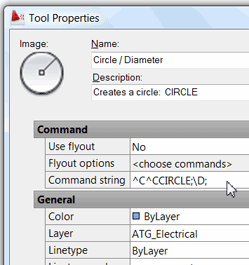
- Right-click on the Circle button on your palette, then click Properties.
- Change the name to something like Circle / Diameter, then modify the text string as follows:
^C^CCIRCLE;\D;
| Here's what the Command String means: | |
| ^C^C | Cancel; essentially hits the ESC key |
| CIRCLE | Launches the CIRCLE command |
| ; | Press <Enter> |
| \ | Pause while you specify the Center of the circle |
| D | Invokes the Diameter option |
- You may also want to set the Color, Layer, and Linetype properties for the circle being created.
- Click OK to close the Tool Properties dialog box, then see how it works!
The Odd Spot
BROWSER Command to a Website
Did you know there was a BROWSER command? I don't know what prompted me to think about this, but I remembered that there was some way to launch a website from the command line… and it was introduced back in A2000i (the "Internet" version).
Instructions to Open a URL from the Command Line
- Enter BROWSER at the command line.
- Enter the URL and AutoCAD turns control over to your browser software and opens the requested URL.
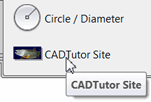
- Add that to your palette with a Command String that reads: ^C^CBROWSER;WWW.CADTUTOR.NET
The Basics
CADTutor Forum & Discussion Forums in AutoCAD Help

Speaking of Internet access, if you haven't been there, our own CADTutor Forum has an informative array of links to topics and threads from Basics thru 3D. This is one of the first places you should investigate or post your questions when you have "issues" with AutoCAD.
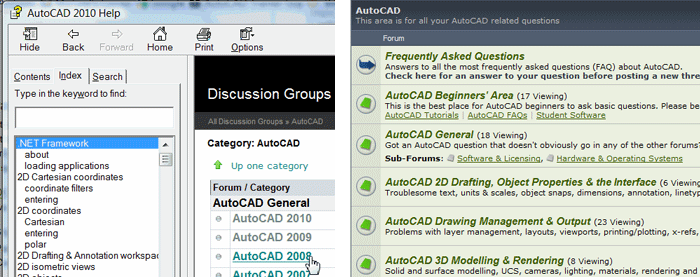
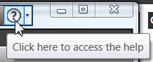 With each new version of AutoCAD, I'm a big proponent of taking a look at the Help offerings. AutoCAD 2010 has a Help button up on the title bar of the application window (I changed F1 to be Quick View Drawings back in the Power Tool of October 2008), and I was pleasantly surprised to see a direct connection to the Autodesk Discussion Group that is displayed directly in the Help window. You will find similar access to the Discussion Group in AutoCAD 2009, too.
Just thought you'd like to know that Help is literally a click away, whether you add a link to the Forum on a button on the tool palette via the BROWSER command, or head for a Discussion Group in Help.
Left Field
They Have To Store It Somewhere: Chevron is constructing a new storage tank at their Malongo facility that, when completed, is believed will be the largest storage tank in Africa at 1.2 M barrels.
More video tutorials on the way!
Later this month, as a special treat, we'll be publishing some help videos to accompany Michael's 3DCLIP tutorial. We'll be sure to let you know when they're available if you've signed up for our newsletter.
David
Donate to CADTutor
If you found this article useful, you might like to consider making a donation. All content on this site is provided free of charge and we hope to keep it that way. However, running a site like CADTutor does cost money and you can help to improve the service and to guarantee its future by donating a small amount. We guess that you probably wouldn't miss $5.00 but it would make all the difference to us.
Note from Michael: I want to thank all of my customers for continuing to retain my training services (some for over three decades!) and let you know your donations do not go to me personally, but to the ongoing maintenance of the CADTutor ship as a whole and to support the yeoman efforts of my friend and CADTutor captain, David Watson, to whom I am grateful for this monthly opportunity to share a few AutoCAD insights.
Share this page:


The Basics
- Dual Dimensions in a Dim…
- UCSICON Options
- "Best of" Basics: Irreg…
- Tool Palette Basics
- Original Dimension Value
- Possible Solutions to th…
- Avoid Using 'Standard' i…
- Shorten the Plot Scales…
- Update the Source File B…
- User Increment Angles fo…
- Drawing Information
- 'Sign Language'
- Rotate with the Copy Opt…
- Use the INSERT Osnap on…
- To or From the Current L…


