

 Michael’s Corner #85
January 2010
New Stuff for the New Year!
This year I'm going to be taking on some new projects. For one, I'm going to become fundamentally literate in Revit so that I can allay the fears of my core customers. Contrary to what you may hear from some, it cannot cure world hunger and it does have a specific focus and may not be for every application. I may even have an article or two this year to pass along what I find out.
I'm also expecting to provide training on another product that I'm very excited about that has to do with the contract furniture industry, but I'm not at liberty to discuss that at this time, so stay tuned.
And finally, I hope to finish the book compiling the last 7 years of Michael's Corner (Oh, please, God). Not sure what format this will take - definitely an eBook for starters - so I have quite a bit on my plate for the next few months.
What you have before you is…
…Referencing a PDF Underlay
…Adding another tool to an existing Panel on the Ribbon
…AutoCAD Timesavers to speed up your system that I learned at Autodesk University
…Status Bar tidbits
I hope this New Year will be your best year ever!
If you would like to contact me directly, you can do that also.
Blessings to one and all,
Michael
PDF Underlay
 Beginning in AutoCAD 2010 (and AutoCAD LT 2010!), the External References palette now includes the ability to attach a PDF as an underlay.
Rule No.1: Be Nice
Since the PDF is technically an externally referenced file, it is important that the method of attaching the PDF is set to "Relative Path". The host drawing must be saved by name before the Relative Path setting can be used.
Instructions to Insert a PDF Underlay
-
 Save your drawing with a name. On the Ribbon, on the Insert tab, References panel, click the Dialog Box launcher… or you could just type XR.
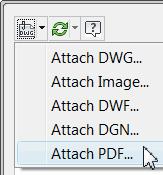
 In the External References palette window, click the dropdown list of attachment types, then click Attach PDF to open the Select Reference File dialog box.
If necessary, change the Files of Type to PDF File (*.pdf), then navigate to the PDF file to attach, and click Open to open the Attach PDF Underlay dialog box.
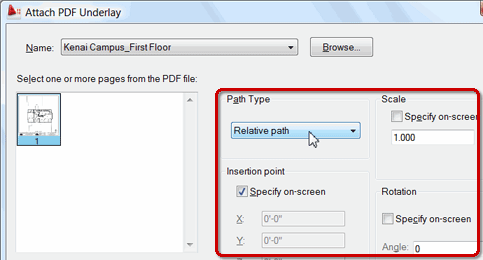
 Set the Path Type to Relative. Leave the Scale at 1.000 and the Rotation at 0 and clear both of their check boxes to Specify on-screen. For Insertion Point, check the box to Specify on-screen.
Click OK, then specify the insertion point to place the PDF. At this point, you can close the External References window.
Insights
-
Use the Scale command with the Reference option to make the drawing 1:1. (See the main article on "Scale & Reference" in Michael's Corner, April 2003.)
-
After scaling the drawing, use the DLINE command with an Osnap of Endpoint to ‘trace’ the walls. (You can download the Dline routine from the AutoCAD Stuff link on my website. Note: Dline is already a command in AutoCAD LT).
The eTransmit command will include the PDF, so use that command when sending the host drawing to others.
Click on any of the objects of the PDF and the contextual tab PDF Underlay appears with four panels. There are options for adjusting the fade, showing or hiding the PDF, and the enabling of Snap, among others.

Power Tool
Add a Tool to a Panel
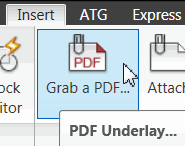 It sure would be nice to get to the PDF Underlay process a little easier than what you experienced in the above article, so let's put that tool on a Ribbon panel!
Although I am a very strong proponent of add your customization under Partial Customization Files of the CUI, in this instance we will add PDF Underlay to the Reference panel of the Insert tab.
Instructions to Add "PDF Underlay" to a Panel
 Type CUI at the command line to open the Customize User Interface.
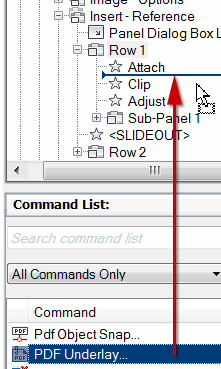
In the upper pane, under All Customization Files, expand the Ribbon node, then Panels, then Insert - Reference, then Row 1.
In the lower pane, under Commands, go find PDF Underlay.
Drag PDF Underlay up and release it among the tools under Row 1 for the Reference panel. In Row 1, drag PDF Underlay to the top of the list.
In the upper right pane of the CUI, under Panel Preview, you will notice that the PDF Underlay tool is small and has no text.
In the Properties pane, under Appearance, click on the line for Button Style, then click "Large with Text (Vertical)". This will update the tool size to be in keeping with the other tools on the panel.
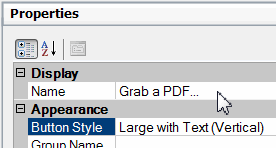 Note: If you would like to supersede the default name of PDF Underlay, put whatever name you would like to display in the Name field at the top of the Properties listing.
Click OK to close the CUI and you should be good to go!
The Odd Spot
AutoCAD Timesavers
 At AU last month I attended one of Lynn Allen's classes - Lynn being the official Autodesk Technical Evangelist - and she was her typical entertaining self. One of her standard classes is "90 AutoCAD Tips in 90 Minutes" and I wanted to pass along just a few of them, specifically since I've been getting regular inquiries regarding speeding up AutoCAD.
AutoCAD Timesavers
In Options
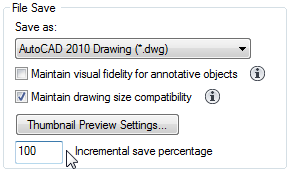
 Open and Save tab, set the "Incremental Save Percentage" to 100. This is the variable ISAVEPERCENT.
In Options
Open and Save tab, when saving down to a previous version, clear the checkbox for "Maintain Visual Fidelity for Annotative Objects".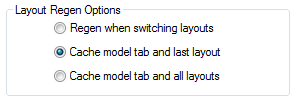 In OptionsSystem tabLayout Regen Options, set it to "Cache Model Tab and Last Layout". This is equivalent to setting the LAYOUTREGENCTL to <1>.
Viewres is a very close relative of Blipmode. Thankfully, Blipmode/On is no longer the default, but not many of us got the memo about Whiparc superseding Viewres. Set WHIPARC to <1> and you won't get hexagons for circles anymore when you zoom in.
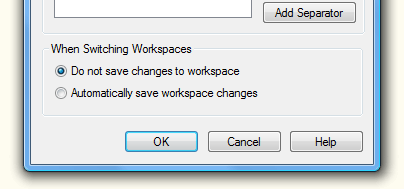
In the Workspace Settings dialog box, your system will move quicker if you set it to "Do Not Save Changes To Workspace".
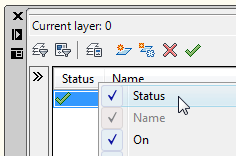
In the Layer Properties Manager, right-click on one of the headers, then turn off the Status column.
The Join command will turn an Arc into a Circle!
The Basics
AutoCAD 2010 Status Bar Tidbits
 AutoCAD's Status bar is getting pretty busy these days, so they have replaced the words - SNAP, GRID, ORTHO, etc. - with what I frequently refer to as "picto-trash". To their credit, however, there are some nice improvements to the button functionality. On the right-half, there are no fewer than 14 other icons; some useful, some not so much. Here are a few insights into the Status bar that will make you a bit more productive.
Need-To-Know Status Bar Tips
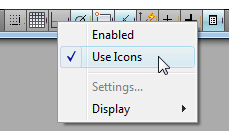
To switch from icons back to words (ORTHO, SNAP, etc.), right-click on one of the icons, then click Use Icons.
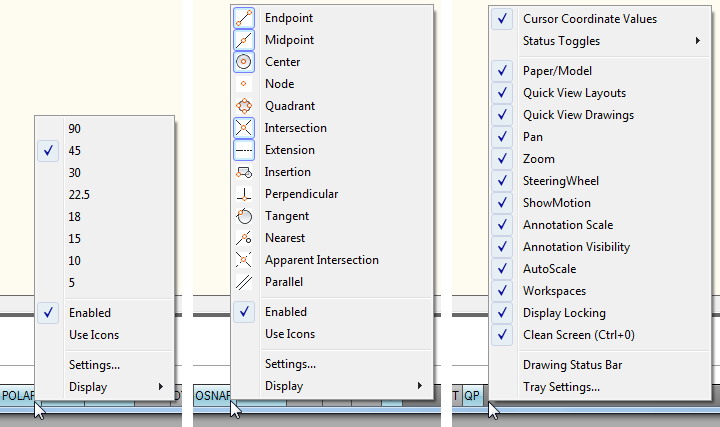
To quickly Set or Clear an Osnap, right-click on OSNAP (or OTRACK) for a list of snap modes you can toggle On/Off in addition to the one(s) currently specified.
The same right-click feature holds true for Polar.
Right-click in an ‘empty’ area on the Status bar for a list of what all those other icons do. If nothing else, you could probably toggle off Pan and Zoom!
Left Field
Nog's Gone: My family happens to love egg nog, so when Food Network had a show on how to make it, I was very interested. Here's a bit of nog lore for the historians out there: It is believed that the eggnog tradition began in Europe as an adaptation of the various milk and wine punches often served at social gatherings. In the 17th century, eggnog was used as a toast to one's health and was consumed by the well-to-do of society as milk and eggs were scarce commodities in Europe.
Donate to CADTutor
If you found this article useful, you might like to consider making a donation. All content on this site is provided free of charge and we hope to keep it that way. However, running a site like CADTutor does cost money and you can help to improve the service and to guarantee its future by donating a small amount. We guess that you probably wouldn't miss $5.00 but it would make all the difference to us.
Note from Michael: I want to thank all of my customers for continuing to retain my training services (some for over three decades!) and let you know your donations do not go to me personally, but to the ongoing maintenance of the CADTutor ship as a whole and to support the yeoman efforts of my friend and CADTutor captain, David Watson, to whom I am grateful for this monthly opportunity to share a few AutoCAD insights.
Share this page:


The Basics
- Dual Dimensions in a Dim…
- UCSICON Options
- "Best of" Basics: Irreg…
- Tool Palette Basics
- Original Dimension Value
- Possible Solutions to th…
- Avoid Using 'Standard' i…
- Shorten the Plot Scales…
- Update the Source File B…
- User Increment Angles fo…
- Drawing Information
- 'Sign Language'
- Rotate with the Copy Opt…
- Use the INSERT Osnap on…
- To or From the Current L…


